

Miguel Aréjula Aísa
- 23/03/2025
Create your first Astro project
Learn how to set up your first Astro project. A step-by-step guide to create a new Astro project.
Introduction: What is Astro?
Astro is a modern web framework designed to build fast, content-focused websites. Unlike traditional JavaScript-heavy frameworks, Astro ships minimal JavaScript to the client by default, leading to improved performance and a better user experience. Astro is perfect for static sites, blogs, portfolios, and other content-driven projects. However, it also supports dynamic routes and server-side rendering (SSR) for more complex applications.
Why Astro?
Astro offers several advantages, including:
- Partial Hydration: Load JavaScript only where necessary.
- Supports Multiple Frameworks: Integrate React, Vue, Svelte, Solid, and more.
- Optimized Performance: Astro optimizes images, prefetches links, and delivers fast-loading pages.
- Easy to Use: Simple syntax and a component-based architecture.
Astro + React, Vue, Svelte, etc.
Astro allows developers to mix and match UI frameworks within a single project. You can use React for interactive components while keeping static content in Astro components. This flexibility enables you to choose the best tool for each part of your website. You can follow the steps in the official Astro documentation to integrate React, Vue, Svelte, Solid, or other frameworks.
Prerequisites
Before starting, ensure you have the following installed:
- Node.js (LTS version recommended)
- npm or pnpm
Create a New Astro Project
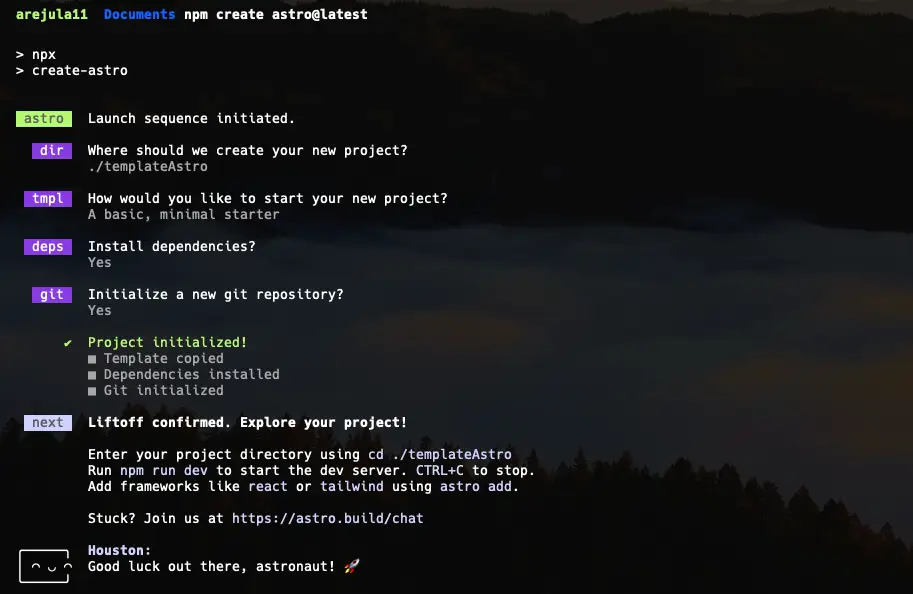
To create a new Astro project, run the following command in your terminal:
npm create astro@latestThis command will prompt you to enter the project name and choose a template. Select the default template to create a new Astro project. Follow the instructions to set up your project.
Project Structure
Once the project is created, the basic structure looks like this:
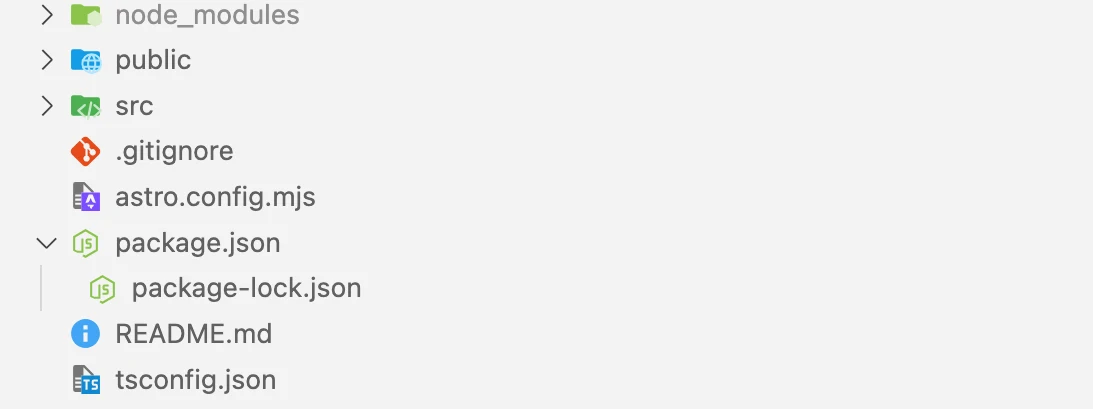
- src/: Contains all the source files for your project.
- pages/: Stores page components that define routes.
- components/: Houses reusable UI components.
- layouts/: Defines reusable page layouts.
- public/: Stores static assets like images, fonts and icons.
- astro.config.mjs: Astro’s configuration file where settings like integrations, output mode, and dev tools are defined.
- package.json: Contains project metadata, dependencies, and scripts.
- tsconfig.json: TypeScript configuration file used for setting up aliases and type support.
- README.md: Documentation about your project, including installation and usage instructions.
Disabling DevTools
Astro includes developer tools to help you build and debug your project. However, I find them distracting when I want to focus on my code. To disable the developer tools, you can modify the Astro configuration file, astro.config.mjs. Add the following line inside the configuration object:
devToolbar: {
    enabled: false
},
Run the Project
To start your Astro project, open a terminal and run the following command:
npm run devThis will launch a local development server, usually available at http://localhost:4321/. You can visit this URL in your browser to preview your site. As you make changes to the source files, Astro will automatically reload the page to reflect updates in real-time. When you first open the project, you’ll see a basic homepage with a welcome message, similar to this:

Layouts, Components, and Pages
Astro follows a structured approach to building web pages using three core concepts: layouts, components, and pages. Understanding how these elements work together will help you create well-organized and maintainable projects.
- Layouts: Layouts act as templates that provide a consistent structure for multiple pages. They typically contain shared elements such as headers, footers, and navigation bars. By defining a layout, you can ensure that all pages using it maintain a uniform design without duplicating code.
- Components: Components are reusable UI elements that help break a website into smaller, manageable parts. They can be used for elements like buttons, forms, or cards that appear in multiple places within a site. This modular approach enhances code reusability and makes maintenance easier.
- Pages: Pages represent the actual routes of your website, such as the homepage, about page, or blog posts. Each .astro file inside the pages/ directory automatically becomes a route, making it simple to structure your site’s content.
By combining layouts, components, and pages, Astro allows developers to create dynamic, scalable websites with minimal effort.
Building Your Astro Project
Astro’s modular approach allows you to efficiently manage different aspects of your project. Let’s explore how to create new pages, components, and layouts while linking them together.
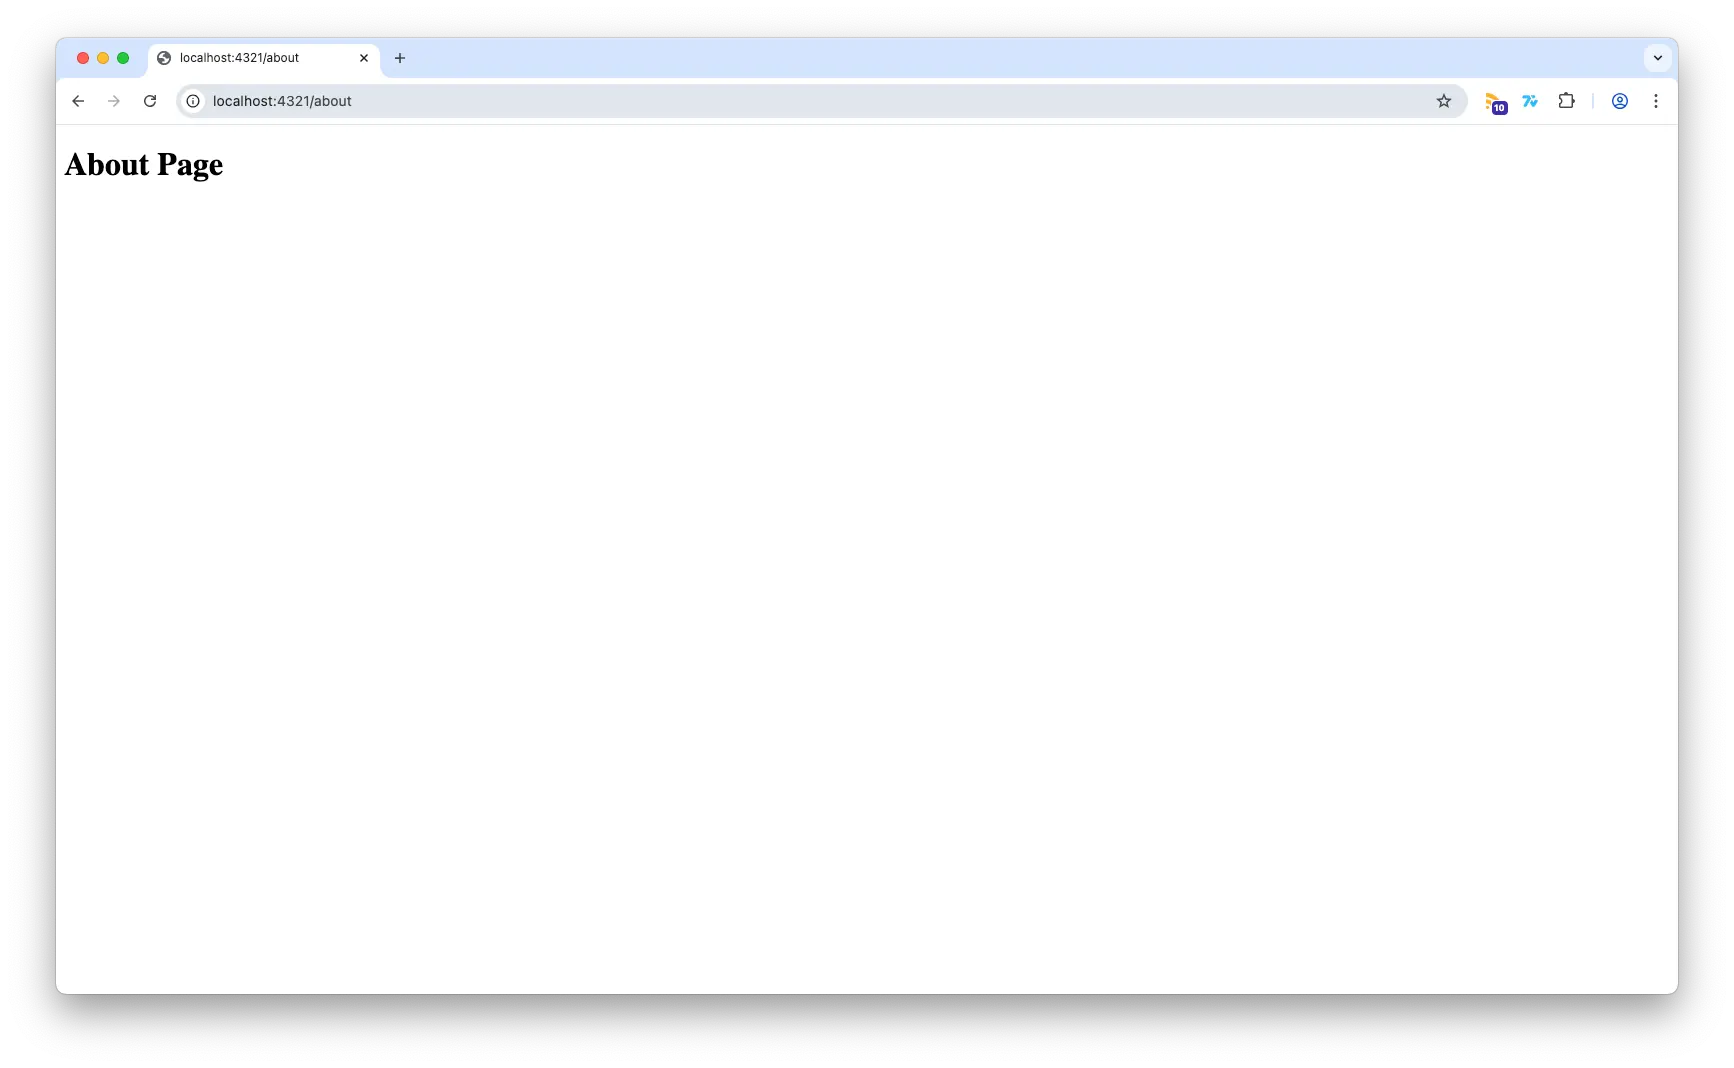
Add a New Page
A page in Astro is simply an .astro file placed inside the src/pages/ directory. To create an About page, add a new file src/pages/about.astro with the following content:
---
---
<h1>About Page</h1>
This page is now automatically accessible via http://localhost:4321/about when running the development server.
Add a New Component
Components help break down your site into reusable parts. For example, let’s create a simple component by adding src/components/Title.astro:
---
export let text;
---
<h1>This is my first component</h1>
Now, you can use this component in your About page by importing it and passing a prop:
---
import Title from '../components/Title.astro';
---
<Title/>
Add a New Layout
Layouts provide a consistent structure across multiple pages. A typical layout includes common elements such as headers and footers. Create src/layouts/MainLayout.astro:
---
export let title;
---
<html>
  <head>
    <title>{title}</title>
  </head>
  <body>
    <slot />
  </body>
</html>
Now, to use this layout in our About page, we modify src/pages/about.astro:
---
import MainLayout from '../layouts/MainLayout.astro';
---
<MainLayout title="About">
  <h1>About Page</h1>
</MainLayout>
This ensures all pages using MainLayout.astro share the same structure, making maintenance easier.
Server-Side Rendering (SSR)
Astro supports SSR, allowing pages to be generated dynamically rather than at build time. To enable SSR, modify astro.config.mjs:
export default {
  output: 'server',
};
With SSR, you can fetch data dynamically and render content at runtime, providing flexibility for applications that rely on APIs or databases.
Dynamic Routes
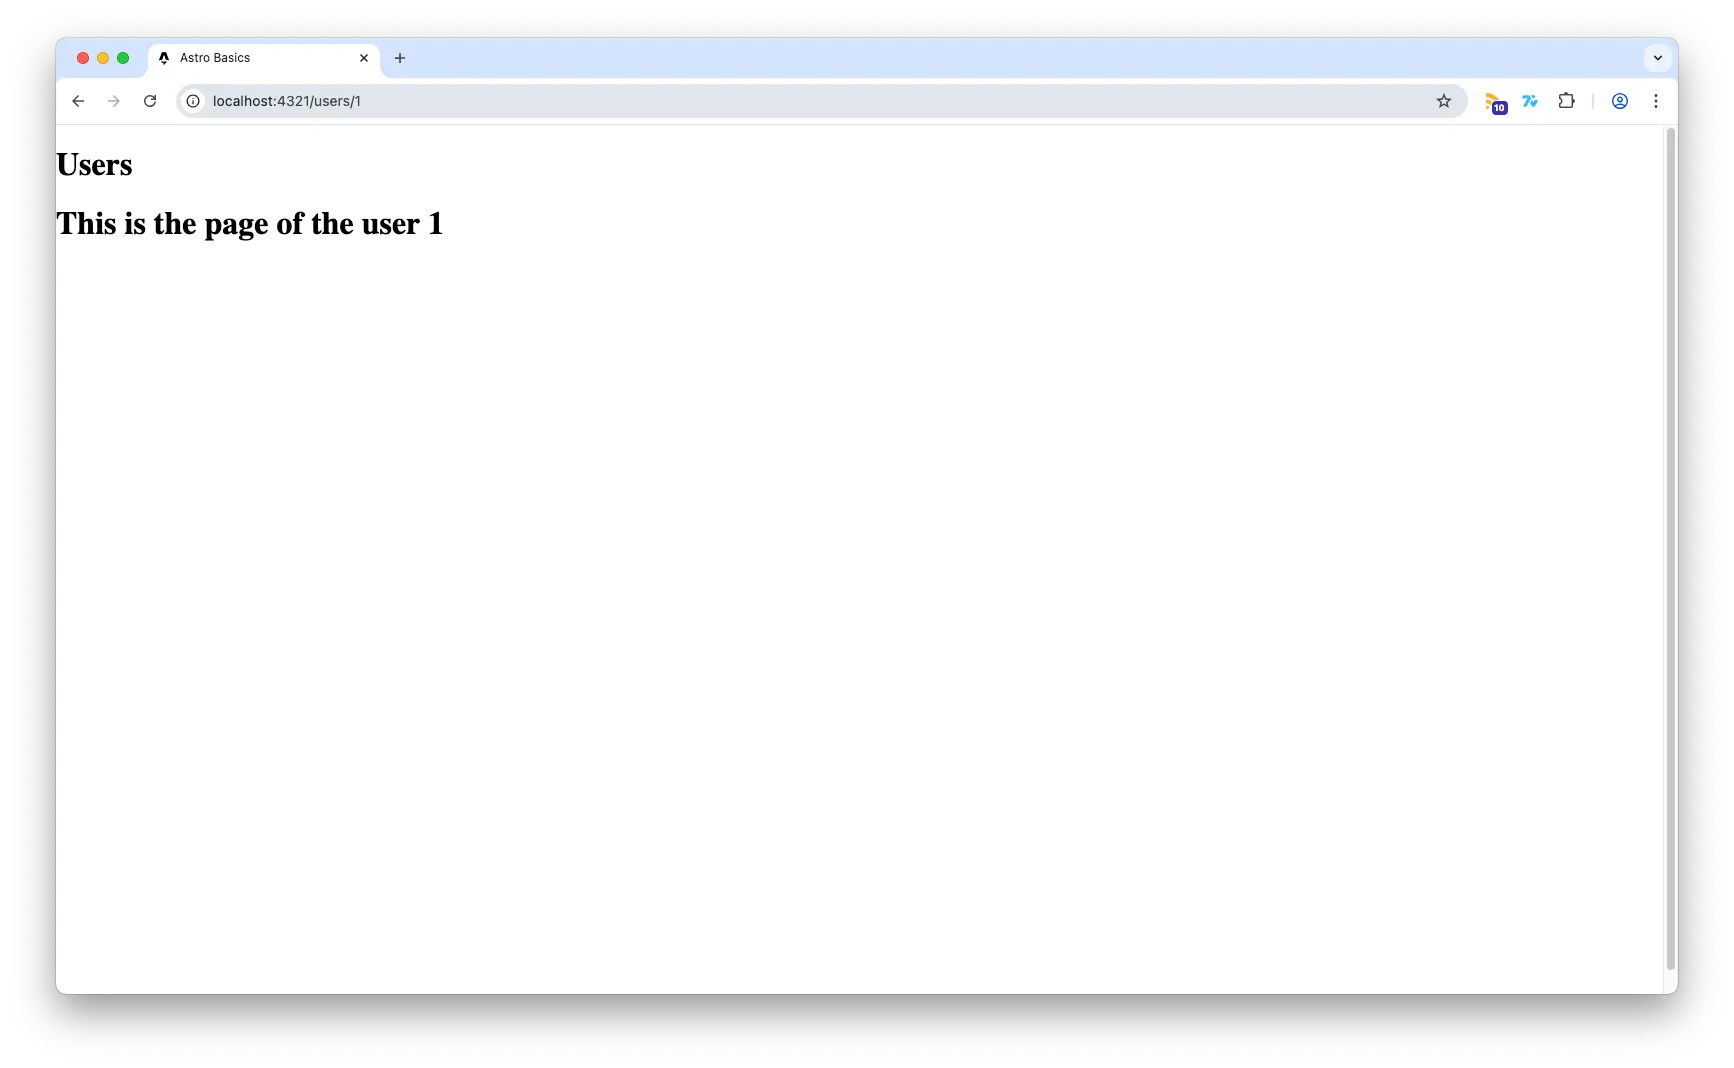
Dynamic Routes at Build Time
Dynamic routes allow pages to generate content based on parameters. To create a dynamic blog post route, add src/pages/post/[id].astro:
---
export async function getStaticPaths() {
  return [{ params: { id: '1' } }, { params: { id: '2' } }];
}
const { id } = Astro.props;
---
<h1>Post {id}</h1>
This will create two routes: /post/1 and /post/2. The getStaticPaths function tells Astro which pages to generate at build time.
Dynamic Routes at Runtime
In contrast, if you don’t know the possible paths beforehand, you can generate pages dynamically at runtime using Astro’s server-side rendering (SSR). Instead of getStaticPaths, you can access route parameters directly in an API-driven or dynamic environment:
---
const { id } = Astro.props;
---
<h1>Post {id}</h1>
With this approach, pages are generated on demand when a user accesses them, which is useful for dynamic content such as user profiles or real-time data.
When to Use Static vs. Runtime Routes
Use getStaticPaths when you have a known set of paths that don’t change frequently. This ensures faster page loads as the routes are pre-built during deployment.
Use runtime-generated routes when the number of pages is unknown or dynamic (e.g., user-generated content, database-driven pages). This allows new pages to be served instantly without rebuilding the site.
By combining static and dynamic routing, layouts, and components, Astro provides a powerful and flexible way to structure your projects efficiently.
Dynamic Paths with Astro (@components, @layouts, @pages)
Dynamic paths in Astro allow you to reference files and components using aliases instead of relative paths. This improves maintainability and readability, especially in larger projects. For example, instead of using:
import Button from '../../components/Button.astro';You can define a path alias and use:
import Button from '@components/Button.astro';Why Are Dynamic Paths Useful?
- Improved Code Readability: Avoids long and complex relative imports.
- Easier Refactoring: Changing the project structure becomes simpler as paths remain consistent.
- Better Organization: Keeps imports clean and structured, especially in component-heavy projects.
To enable dynamic paths, configure them in tsconfig.json:
{
  "compilerOptions": {
    "paths": {
      "@components/*": ["src/components/*"],
      "@layouts/*": ["src/layouts/*"],
      "@pages/*": ["src/pages/*"]
    }
  }
}
After this setup, you can import files using the defined aliases throughout your Astro project, making development smoother and more efficient. Now you can use:
import Button from '@components/Button.astro';Astro + Tailwind CSS
Tailwind CSS is a utility-first CSS framework that allows developers to style applications efficiently by using predefined classes directly in the markup. Unlike traditional CSS frameworks that rely on predefined components, Tailwind provides low-level utility classes that enable highly customizable designs without writing custom CSS. This approach simplifies styling, reduces CSS file sizes, and enhances maintainability. Tailwind works seamlessly with Astro, making it easy to create visually appealing and responsive websites. To use it in your Astro project, follow the steps described in the official Tailwind documentation.
Then you can start using Tailwind classes directly in your Astro components:
---
import '../styles/global.css';
---
<div class="bg-gray-100 p-4">
  <h1 class="text-2xl font-bold text-blue-500">Hello, Astro!</h1>
  <p class="text-gray-700">Welcome to my Astro project.</p>
</div>
Furthermore you can set up your styles in global.css adding the following code:
@theme {
    --color-primary: #f5c242;
    --color-secondary: #4b42f5;
    --color-accent: #fff;
    --color-accent-dark: #9B9B9B;
    --color-text: #000;
}
This will allow you to use these custom colors in your components:
---
import '../styles/global.css';
---
<div class="bg-primary p-4">
  <h1 class="text-2xl font-bold text-accent">Hello, Astro!</h1>
  <p class="text-text">Welcome to my Astro project.</p>
</div>
Conclusion
If you want to kickstart your Astro project with a fully configured and optimized setup, check out my GitHub repository. This template includes best practices, a predefined project structure, and essential integrations, making it easier to start building your website efficiently. Whether you’re a beginner or an experienced developer, this template can save you time and effort by providing a solid foundation for your Astro projects.
I hope this guide has helped you understand the basics of Astro and how to create your first project. By leveraging Astro’s features, you can build fast, content-focused websites with ease. Experiment with different integrations, layouts, and components to create unique and engaging web experiences. Happy coding!