

Miguel Aréjula Aísa
- 19/10/2025
Discover Neovim: The Modern & Customizable Evolution of Vim
Learn what Neovim is, why developers are switching to it and how its modern features and customizability can boost your coding workflow.
Last week, we explored Vim, a fast, keyboard-driven text editor that’s loved (and sometimes feared) by developers around the world. This week, we’re taking things a step further and diving into Neovim, a modern evolution of Vim that brings the same power and efficiency into today’s workflows.
Neovim takes everything that makes Vim great and updates it for today’s development needs. It keeps the same core editing philosophy, but adds modern features, easier customization, and better support for plugins and tools, making it feel faster and more flexible without losing the Vim you already know.
If Vim is like a vintage sports car, reliable, fast and full of character, Neovim is the tuned-up version with a smoother engine, updated dashboard and better handling. You still get the same thrill, but with all the modern comforts developers expect today.
By the end, you’ll understand why so many developers are making the switch from Vim to Neovim, and how you can take advantage of its modern features to boost your productivity.
What Is Neovim?
Neovim is a modern, open-source text editor built as an improvement and extension of Vim. It was created to address some of the limitations of Vim’s architecture while preserving its core philosophy of efficiency and keyboard-driven editing.
At its core, Neovim is still Vim; it uses the same commands, modes and editing philosophy. If you already know how to move around and edit text in Vim, you’ll feel right at home in Neovim. But under the hood, it introduces changes that make it more flexible and future-ready.
Here’s what sets Neovim apart:
Modern Architecture
Vim’s codebase had grown difficult to extend over time. Neovim rebuilt large parts of it to make the editor more modular and plugin-friendly, meaning new features can be added more easily without breaking everything else.
Asynchronous Plugins
In Neovim, plugins can run asynchronously, meaning they don’t freeze the editor while running background tasks like linting, formatting or autocompletion. This makes the whole experience smoother and more responsive.
Better Integration with Modern Tools
Neovim integrates seamlessly with Language Server Protocols (LSP), Tree-sitter for syntax highlighting and modern plugin managers. These features turn it into a true coding environment rather than just a text editor.
Active Development and Community
While Vim is still maintained, Neovim has a very active open-source community constantly pushing updates, adding integrations and refining the experience. This means faster development and more innovation.
In short, Neovim takes the timeless principles of Vim; efficiency, control, and keyboard-driven editing; and adapts them for modern development needs. It’s the same philosophy, redesigned for today’s workflows.
Installing Neovim
Getting started with Neovim is simple, and just like Vim, it’s available on all major platforms. You can install it on Linux, macOS, or Windows in just a few steps.
Linux
Most Linux distributions include Neovim in their repositories. To check if it’s already installed, run:
nvim --versionIf you see version information, you’re all set. Otherwise, install it using your package manager:
sudo apt install neovim       # Ubuntu / Debian
sudo dnf install neovim       # Fedora
sudo pacman -S neovim         # Arch
For the latest version, you can also use AppImage or install from the official Neovim GitHub page.
macOS
You can install Neovim with Homebrew, which makes setup quick and easy:
brew install neovimOnce installed, open it from your terminal with:
nvimWindows
Neovim works great on Windows too. You can install it using Chocolatey or Scoop:
choco install neovimor
scoop install neovimAlternatively, you can grab the latest .zip file from the official release page and add it to your system’s PATH. To open Neovim, run nvim in PowerShell or Command Prompt.
First Launch
When you open Neovim for the first time, you’ll notice it looks very similar to Vim, a blank screen waiting for input. That’s because Neovim retains Vim’s modal editing system. You can use all the same basic commands (i, :wq, dd, etc.) right away. The real fun begins when you start customizing it and adding plugins, something Neovim makes much easier than Vim.
Key Features That Make Neovim Stand Out
At first glance, Neovim looks almost identical to Vim; the same interface, the same commands and the same editing modes. But once you start using it, you’ll notice that Neovim feels faster, smoother and more capable.
Built-in LSP Support
Neovim has native LSP support, which brings IDE-like features such as autocompletion, go-to-definition and inline diagnostics directly into your editor, no heavy extensions required.
With a few lines of configuration, you can connect Neovim to any modern language server and enjoy the same smart code intelligence that you’d expect from editors like VS Code.
Tree-sitter for Better Syntax Highlighting
Tree-sitter is a modern parsing library that gives Neovim precise, context-aware syntax highlighting. Instead of relying on old regex-based highlighting, Tree-sitter understands the structure of your code, resulting in cleaner, faster and more accurate coloring, especially for large or complex files.
Lua-Based Configuration
One of the biggest upgrades from Vimscript is that Neovim can be fully configured using Lua, a lightweight programming language that’s easier to read, faster and more flexible. This change makes it simpler to write and organize your config files and has opened the door for an entire ecosystem of Lua-based plugins that are faster and more maintainable than older Vimscript ones.
Modern Plugin Ecosystem
Neovim’s plugin community is thriving. There are plugins for everything, file explorers, fuzzy finders, Git integration, debugging, code formatting and more. Tools like Telescope, nvim-tree and Lualine have become must-haves for many developers. With plugin managers like lazy.nvim or packer.nvim, installing and updating plugins is quick and painless.
Customizing Neovim: Make It Yours
Neovim’s greatest strength is its flexibility. You can shape nearly every aspect — from looks and keybindings to plugins and workflow.
Configuration Basics
When you first install Neovim, it doesn’t come heavily configured, and that’s a good thing. You get a clean slate to build on. Neovim stores its configuration files in a specific directory depending on your operating system, for Linux / macOS, ~/.config/nvim/, for Windows, C:\Users\<your-user>\AppData\Local\nvim\. Inside that folder, create a file called init.lua. This file replaces Vim’s vimrc and allows you to write your configuration in Lua, which is faster and easier to maintain than Vimscript.
Setting Up lazy.nvim
To manage plugins easily, we’ll use lazy.nvim due to its speed and simplicity. Add this snippet to your init.lua:
local lazypath = vim.fn.stdpath("data") .. "/lazy/lazy.nvim"
if not vim.loop.fs_stat(lazypath) then
  vim.fn.system({
    "git", "clone", "--filter=blob:none",
    "https://github.com/folke/lazy.nvim.git",
    "--branch=stable", lazypath
  })
end
vim.opt.rtp:prepend(lazypath)

require("lazy").setup({
  { "nvim-telescope/telescope.nvim", dependencies = { "nvim-lua/plenary.nvim" } },
  { "nvim-treesitter/nvim-treesitter", build = ":TSUpdate" },
  { "neovim/nvim-lspconfig" },
  { "hrsh7th/nvim-cmp", dependencies = { "hrsh7th/cmp-nvim-lsp", "hrsh7th/cmp-buffer" } },
  { "nvim-lualine/lualine.nvim" },
  { "EdenEast/nightfox.nvim" }
})
Once saved, open Neovim and run :Lazy sync to install your plugins.
Keybindings
Keybindings are at the heart of the Vim/Neovim experience. You can map any command or plugin action to any key combination, for example:
vim.keymap.set("n", "<leader>w", ":w<CR>", { desc = "Save file" })
vim.keymap.set("n", "<leader>q", ":q<CR>", { desc = "Quit" })
vim.keymap.set("n", "<leader>e", ":Ex<CR>", { desc = "Open file explorer" })
vim.keymap.set("n", "<leader>h", ":nohlsearch<CR>", { desc = "Clear search highlights" })
vim.keymap.set("n", "<leader>n", ":enew<CR>", { desc = "New file" })
vim.keymap.set("n", "<leader>r", ":source %<CR>", { desc = "Reload current config" })
vim.keymap.set("n", "<leader>ff", ":Telescope find_files<CR>", { desc = "Find files" })
vim.keymap.set("n", "<leader>fg", ":Telescope live_grep<CR>", { desc = "Search text" })
vim.keymap.set("n", "<leader>t", ":NvimTreeToggle<CR>", { desc = "Toggle file tree" })
Themes and Interface
Changing themes is as simple as:
vim.cmd[[colorscheme nightfox]]Or adding another theme plugin and switching:
{ "folke/tokyonight.nvim" }, { "catppuccin/nvim", name = "catppuccin" }
vim.cmd[[colorscheme catppuccin]]
Small interface tweaks can improve usability:
vim.opt.colorcolumn = "80"
vim.opt.signcolumn = "yes"
vim.opt.cursorline = true
vim.opt.scrolloff = 8
Navigation and Statusline
You can navigate splits and buffers efficiently:
vim.keymap.set("n", "<C-h>", "<C-w>h", { desc = "Move left" })
vim.keymap.set("n", "<C-l>", "<C-w>l", { desc = "Move right" })
vim.keymap.set("n", "<C-j>", "<C-w>j", { desc = "Move down" })
vim.keymap.set("n", "<C-k>", "<C-w>k", { desc = "Move up" })
vim.keymap.set("n", "<Tab>", ":bnext<CR>", { desc = "Next buffer" })
vim.keymap.set("n", "<S-Tab>", ":bprevious<CR>", { desc = "Previous buffer" })
For statusline customization:
require('lualine').setup({
  options = { theme = 'auto', section_separators = '', component_separators = '' },
  sections = {
    lualine_a = {'mode'}, lualine_b = {'branch', 'diff'}, lualine_c = {'filename'},
    lualine_x = {'encoding', 'filetype'}, lualine_y = {'progress'}, lualine_z = {'location'}
  }
})
Extra Quality-of-Life Tweaks
vim.opt.hidden = true
vim.opt.clipboard = "unnamedplus"
vim.opt.autoread = true
vim.api.nvim_create_autocmd("TextYankPost", {
  callback = function() vim.highlight.on_yank({ timeout = 200 }) end
})
Organizing Your Config
Split your configuration into multiple files inside ~/.config/nvim/lua/:
require("settings")
require("keymaps")
require("plugins")
require("lsp")
Reloading Config
Whenever you edit your configuration, reload it with :source % or the shortcut <leader>r.
My Minimal Neovim Setup
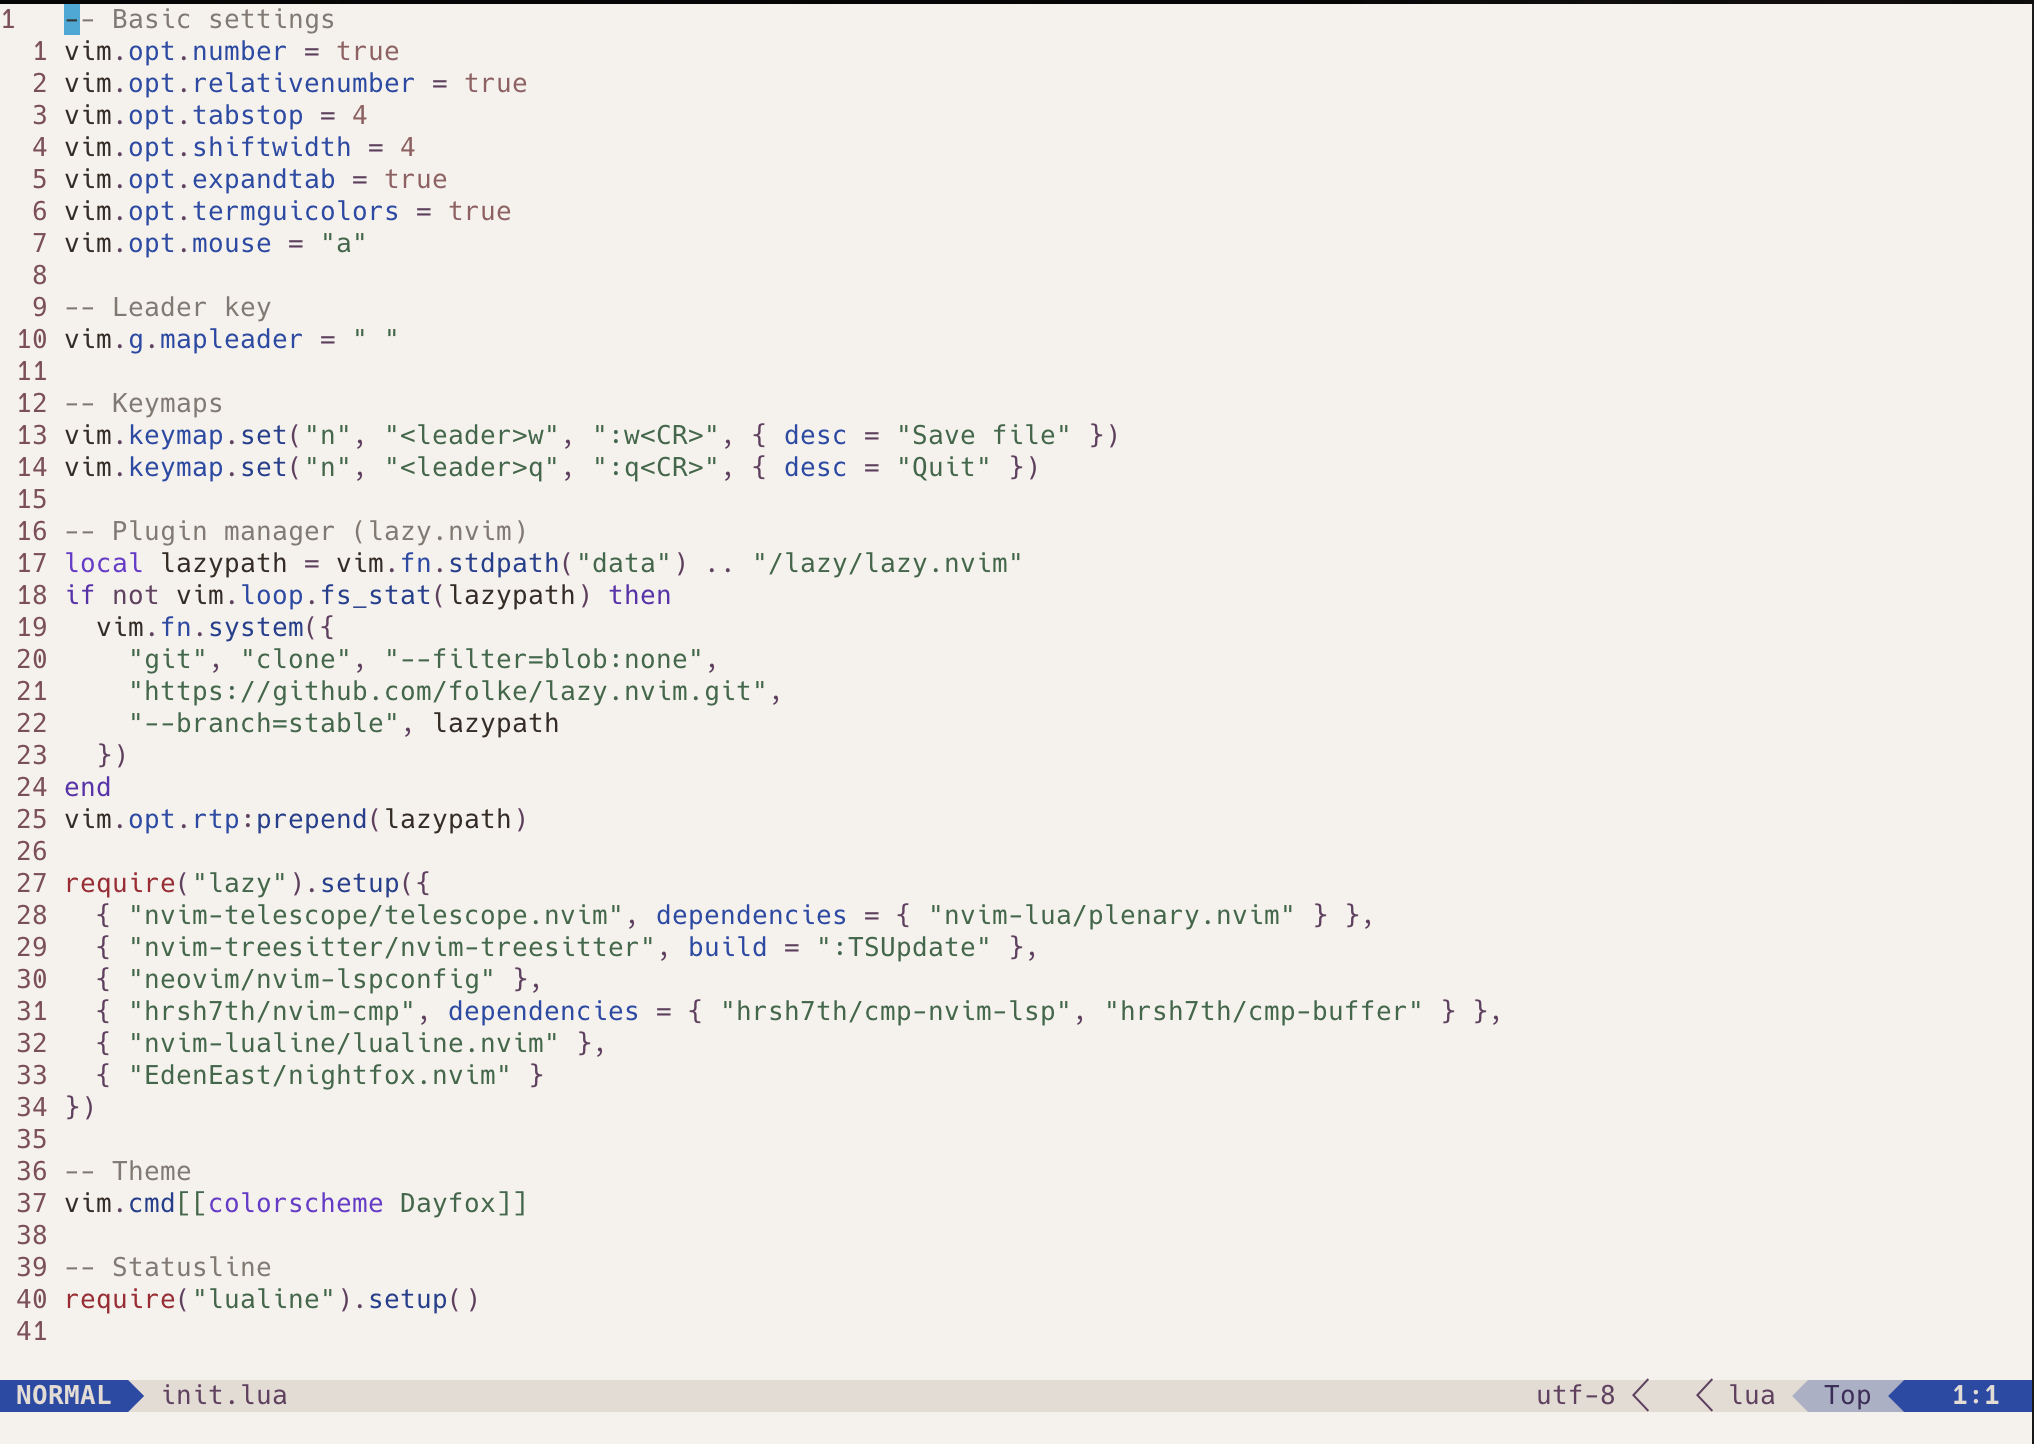
To make things concrete, here’s a minimal but complete Neovim configuration that you can copy into your init.lua to get started quickly:
-- Basic settings
vim.opt.number = true
vim.opt.relativenumber = true
vim.opt.tabstop = 4
vim.opt.shiftwidth = 4
vim.opt.expandtab = true
vim.opt.termguicolors = true
vim.opt.mouse = "a"

-- Leader key
vim.g.mapleader = " "

-- Keymaps
vim.keymap.set("n", "<leader>w", ":w<CR>", { desc = "Save file" })
vim.keymap.set("n", "<leader>q", ":q<CR>", { desc = "Quit" })

-- Plugin manager (lazy.nvim)
local lazypath = vim.fn.stdpath("data") .. "/lazy/lazy.nvim"
if not vim.loop.fs_stat(lazypath) then
  vim.fn.system({
    "git", "clone", "--filter=blob:none",
    "https://github.com/folke/lazy.nvim.git",
    "--branch=stable", lazypath
  })
end
vim.opt.rtp:prepend(lazypath)

require("lazy").setup({
  { "nvim-telescope/telescope.nvim", dependencies = { "nvim-lua/plenary.nvim" } },
  { "nvim-treesitter/nvim-treesitter", build = ":TSUpdate" },
  { "neovim/nvim-lspconfig" },
  { "hrsh7th/nvim-cmp", dependencies = { "hrsh7th/cmp-nvim-lsp", "hrsh7th/cmp-buffer" } },
  { "nvim-lualine/lualine.nvim" },
  { "EdenEast/nightfox.nvim" }
})

-- Theme
vim.cmd[[colorscheme Dayfox]]

-- Statusline
require("lualine").setup()
After adding this to your init.lua and running :Lazy sync, your Neovim setup will include line numbers, relative line numbers, a modern theme, a status line, and some essential plugins to improve navigation, syntax highlighting, and autocompletion. Here’s how it looks in action:
Breaking It Down
-
Basic Settings – enables line numbers, relative numbers, spaces instead of tabs, color support, and mouse usage. These small tweaks make Neovim feel modern and comfortable right away.
-
Leader Key – the leader key acts as a prefix for your custom shortcuts. Setting it to space makes defining intuitive keymaps simple, like Space + w to save or Space + q to quit.
-
Installing lazy.nvim – checks if the plugin manager is installed and downloads it automatically if not. Once loaded, you can declare plugins inside
require("lazy").setup(). -
Essential Plugins – includes Telescope for fuzzy searching, nvim-treesitter for syntax awareness, nvim-lspconfig for language server integration, nvim-cmp for autocompletion, lualine for a modern status line, and nightfox for a performance-friendly colorscheme.
-
Applying the Theme –
vim.cmd[[colorscheme Dayfox]]sets the color scheme. You can easily switch to other options like nightfox, dawnfox, or nordfox depending on your mood. -
Status Line Setup –
require("lualine").setup()initializes a clean, customizable bottom bar that displays useful file info, mode, and more.
This example gives you a fully functional, modern Neovim setup that’s easy to expand with more plugins or customizations as you get more comfortable.
Tips for Mastering Neovim
Practice the basics every day, learn by tweaking your config, explore plugins that improve workflow, stay curious about the community and be patient, mastering Neovim is a rewarding journey.
If you’re new or want a refresher, running the command :Tutor inside Neovim is a great way to practice basic motions, commands, and workflows interactively. It’s like having a built-in guide to get comfortable with Vim’s editing philosophy before diving deeper.
Wrapping Up
Neovim isn’t just a modernized Vim, it’s a reimagined editor built for today’s workflows. With built-in LSP, Lua configuration and an ever-growing plugin ecosystem, it offers Vim’s timeless efficiency with modern power and polish.
Happy coding!