Miguel Aréjula Aísa
- 16/11/2025
Build a VS Code Extension with React & TailwindCSS: Step-by-Step
Learn how to create a modern VS Code extension with a React + TailwindCSS webview. This guide walks you through initializing the extension, configuring Vite and Tailwind, integrating React for UI, and running your extension in VS Code, providing a fast, interactive, and fully typed TypeScript setup.
Building a modern VS Code extension doesn’t have to be limited to plain HTML or basic scripts. With the rise of frameworks like React and styling tools like TailwindCSS, you can create rich, interactive webviews that feel like native applications right inside your editor.
In this guide, I’ll walk you step-by-step through creating a VS Code extension with a React + TailwindCSS webview, bundled using Vite. By the end, you’ll have a clean, fast, and fully interactive interface running inside VS Code; perfect for data visualization, dashboards, or any custom workflow tool.
Whether you’re a TypeScript developer looking to expand your skills or just curious about building modern VS Code tools, this tutorial covers everything from project setup to publishing-ready extension logic.
Why Use React + TailwindCSS for VS Code Extensions
Traditional VS Code extensions often rely on plain HTML, CSS, and JavaScript for Webviews. While this works for simple tools, it can quickly become hard to maintain as your UI grows more complex.
By using React, you gain:
- Component-based architecture – Break your UI into reusable, testable pieces.
- State management – Easily handle dynamic tables, forms or interactive components.
TailwindCSS complements this by providing:
- Utility-first styling – Write concise, responsive styles directly in your JSX without managing long CSS files.
- Consistent design – Keep your UI visually coherent with minimal effort.
- Rapid prototyping – Quickly style new components and adjust layouts as you iterate.
Together with Vite, this stack provides a fast, modern and fully typed development environment. You get quick rebuilds, seamless integration with TypeScript, and the ability to deliver professional-looking extensions that feel native to VS Code. This combination brings your extension development closer to building a full-fledged web application, while still keeping the extension lightweight and performant inside the editor.
Step-by-Step Guide: Building a VS Code Extension with React + TailwindCSS
Last week, I shared how I built my first VS Code extension, CSV Table Viewer, using plain TypeScript and Webviews. If you missed it, you can check it out here.
In this post, I’ll show you how to take it a step further by integrating React and TailwindCSS into your extension. This setup gives you a modern development workflow, fast iteration with Vite, and the ability to build interactive, maintainable UIs inside VS Code.
We’ll go through:
- Initializing a new VS Code extension scaffold.
- Installing React, TailwindCSS, and Vite dependencies.
- Configuring Tailwind and Vite for the webview.
- Creating the React webview frontend.
- Implementing the VS Code extension backend logic.
- Running, building, and packaging your extension for testing or publishing.
By the end, you’ll have a fully functional VS Code extension with a modern webview powered by React + Tailwind, ready for customization or publishing.
1. Initialize the Extension
The first step is to scaffold a new VS Code extension using the Yeoman generator. This sets up all the necessary project structure, configuration files, and build scripts for a TypeScript-based extension.
Open your terminal and run:
npm install -g yo generator-code
yo code
Yeoman will ask a few questions:
- Choose TypeScript as the language (for type safety and better tooling).
- Select New Extension (TypeScript) as the project type.
- Name your extension (e.g.,
react-tailwind-extension). - Choose unbundled or esbuild for packaging (we’ll handle the frontend separately with Vite).
After the scaffolding is complete, you’ll have a ready-to-run structure with:
src/extension.ts– your main extension logic.package.json– metadata, commands, and activation events..vscode/launch.json– debugging configuration.
You can now test the scaffold by pressing F5 in VS Code. This opens a new Extension Development Host window with your extension loaded. You’ll see a “Hello World” command available in the Command Palette.
Sometimes the default engine in package.json doesn’t match your installed VS Code version. Update it to a recent version (e.g., ^1.80.0) to avoid activation issues.
This scaffold is the foundation for adding React and TailwindCSS to your webview in the next steps.
2. Install Dependencies
With the extension scaffold ready, the next step is to set up the frontend stack for your webview: React, TailwindCSS, and Vite. We’ll also add TypeScript tooling for full type safety.
Run the following commands in your project folder:
# Install React and ReactDOM
npm install react react-dom

# Install development dependencies for Vite, Tailwind, and TypeScript
npm install -D vite @vitejs/plugin-react typescript \
  tailwindcss postcss autoprefixer @tailwindcss/postcss \
  @types/react @types/react-dom
What each package does:
react&react-dom– core React library for building your webview UI.vite– fast build tool with Hot Module Replacement (HMR) for smooth frontend development.@vitejs/plugin-react– integrates React with Vite, including JSX and fast refresh.typescript– provides type checking for both the extension backend and React frontend.tailwindcss,postcss,autoprefixer– handle utility-first styling for your components.@types/react&@types/react-dom– TypeScript type definitions for React.
After installing, your project is ready to configure Tailwind and Vite for a modern, reactive webview experience inside VS Code.
3. Configure Tailwind and Vite
With all dependencies installed, the next step is to configure TailwindCSS, PostCSS, and Vite so the webview can be built cleanly and bundled into your VS Code extension.
Create the PostCSS config files named postcss.config.mjs in the root of your project:
// postcss.config.mjs
export default {
  plugins: {
    "@tailwindcss/postcss": {},
  },
};
This tells PostCSS to use Tailwind’s PostCSS plugin during the build.
Then create a folder inside src named webview. Then, an index.css file:
/* webview/index.css */
@import "tailwindcss";
This imports Tailwind’s layers and lets you use the utility classes directly in your JSX.
Configure Vite
Next, set up Vite so it can build your webview into a production-ready bundle inside the extension.
Create a vite.config.ts file in the root of your project:
// vite.config.ts
import { defineConfig } from "vite";
import react from "@vitejs/plugin-react";
import path from "path";

export default defineConfig({
  plugins: [react()],
  build: {
    outDir: "dist",                         // output bundle for Webview
    emptyOutDir: true,                      // clear dist before build
    rollupOptions: {
      input: path.resolve(__dirname, "src/webview/index.tsx"),
      output: {
        entryFileNames: "bundle.js",
      },
    },
  },
});
4. Create the React Webview Frontend
Your React webview lives inside webview/, and Vite will compile it into the dist/ folder for VS Code to load. This section sets up the entry point, the React root, and a basic component.
webview/index.tsx (Entry Point)
This file initializes the React application and mounts it into the webview’s DOM root.
// webview/index.tsx
import React from "react";
import ReactDOM from "react-dom/client";
import App from "./App";
import "./index.css"; // The Tailwind entry style file

const rootElement = document.getElementById("root");
if (rootElement) {
  const root = ReactDOM.createRoot(rootElement);
  root.render(
    <React.StrictMode>
      <App />
    </React.StrictMode>
  );
}
This is the exact entry Vite uses when bundling the webview.
webview/App.tsx (Main Component)
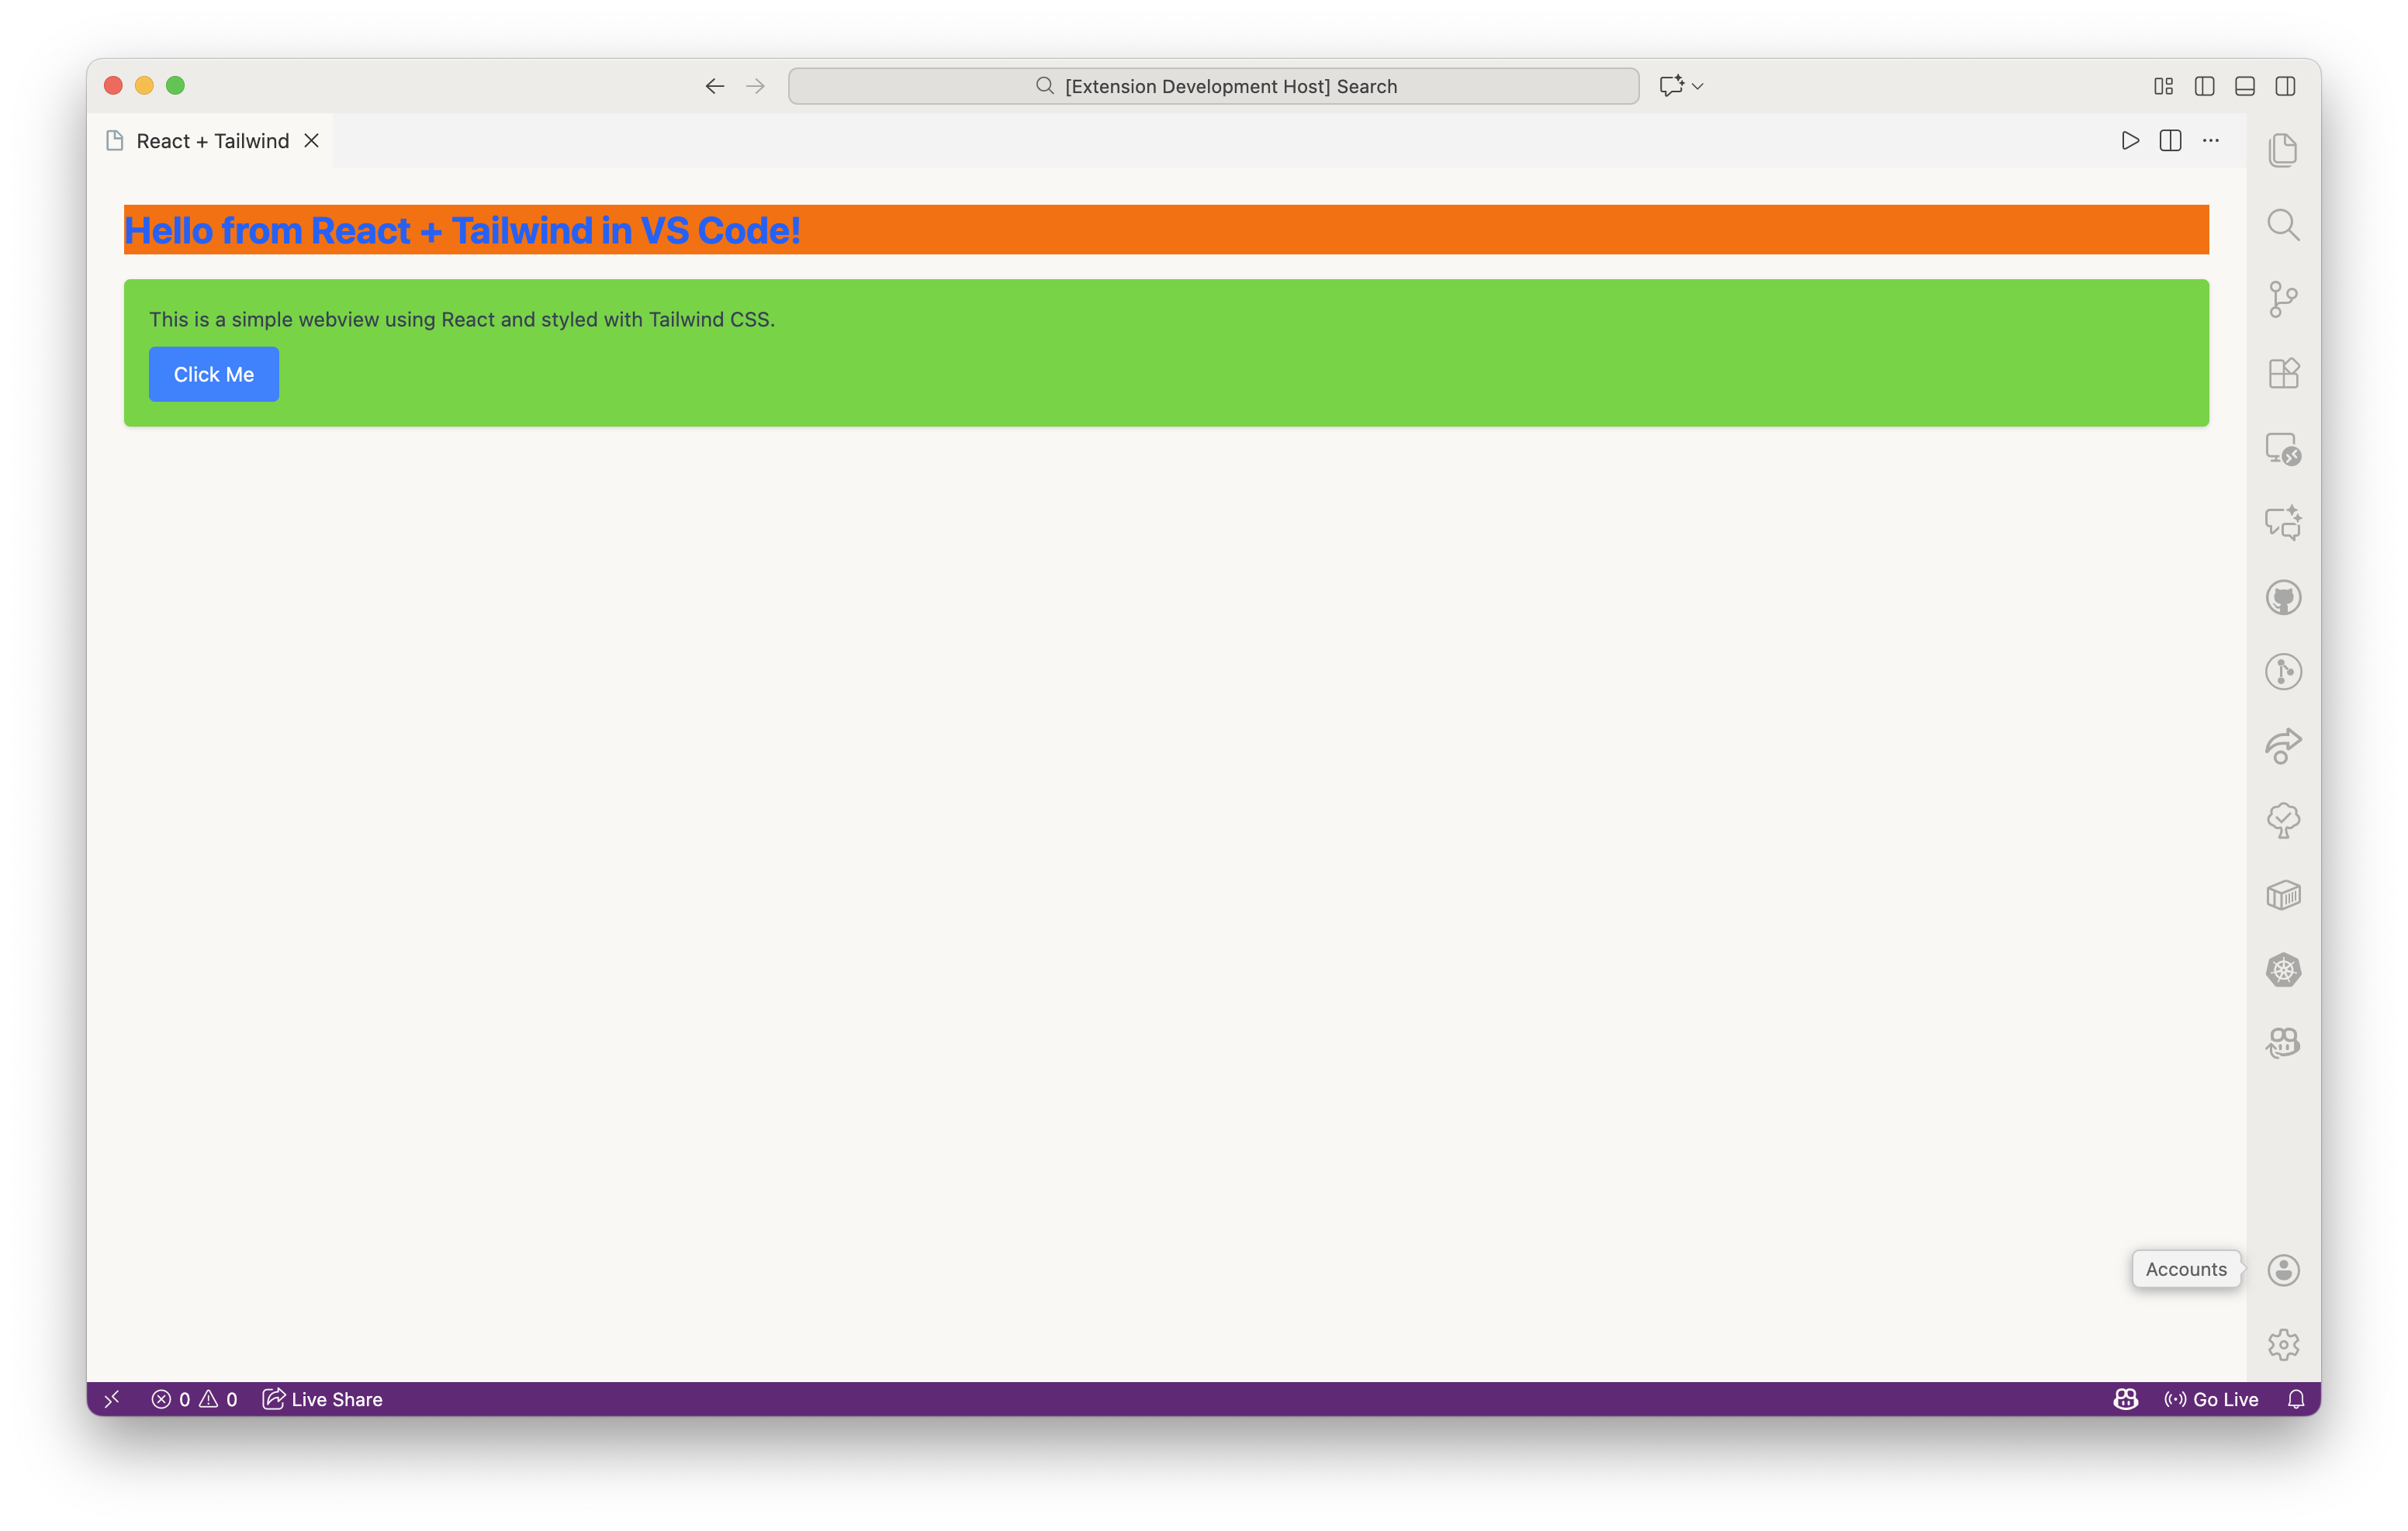
Create a simple component to confirm React, Tailwind, and the build are configured correctly.
// webview/App.tsx
import React from "react";

export default function App() {
	return (
		<div className="p-6 bg-gray min-h-screen">
		<h1 className="text-2xl font-bold text-blue-600 bg-orange-500">
			Hello from React + Tailwind in VS Code!
		</h1>
		<div className="mt-4 p-4 bg-[#50d71e] rounded shadow">
			<p className="text-gray-700">
			This is a simple webview using React and styled with Tailwind CSS.
			</p>
			<button className="mt-2 px-4 py-2 bg-blue-500 text-white rounded hover:bg-blue-600">
				Click Me
			</button>
		</div>
	</div>
	);
}
Tip: VS Code uses a dark or light theme. You’ll need to use Tailwind’s
dark:variants to ensure your UI looks good in both.
5. TypeScript Configuration
Your React webview and your VS Code extension backend both rely on TypeScript. You need a shared configuration that supports modern ECMAScript output, JSX compilation, DOM and VS Code APIs, and strict type-checking.
tsconfig.json
Create or update your tsconfig.json in the root with the following configuration:
{
  "compilerOptions": {
    "target": "ES2020",
    "module": "ESNext",
    "lib": ["ES2020", "DOM"],
    "outDir": "out",
    "rootDir": "src",
    "strict": true,
    "esModuleInterop": true,
    "skipLibCheck": true,
    "forceConsistentCasingInFileNames": true,
    "jsx": "react-jsx",
    "moduleResolution": "Node"
  },
  "include": ["src"],
  "exclude": ["node_modules", "dist", "vite"]
}
Why these settings matter
- target: “ES2020” & moduleResolution: “NodeNext” – Modern standards for the VS Code runtime and better module compatibility.
- jsx: “react-jsx” – Enables the modern React JSX transformation.
- lib: [“ES2020”, “DOM”] – Provides type support for both the extension backend and the webview’s browser APIs.
- include: [“src”, “webview”] – Ensures type-checking runs on both your extension backend code and your React frontend code.
- exclude: [“dist”] – Prevents Vite’s built output from being type-checked.
6. Implementing the Extension
Now we write the code in src/extension.ts that registers the command, creates the webview panel and most importantly, securely loads the assets from the Vite build.
The extension.ts Logic
This logic creates the HTML template and injects the bundled JavaScript and CSS files that Vite produced in the dist folder.
// src/extension.ts
import * as vscode from "vscode";
import * as path from "path";

export function activate(context: vscode.ExtensionContext) {
  context.subscriptions.push(
    vscode.commands.registerCommand("react-tailwind-extension.start", () => {
      const panel = vscode.window.createWebviewPanel(
        "reactWebview",
        "React + Tailwind",
        vscode.ViewColumn.One,
        {
          enableScripts: true,
          localResourceRoots: [
            vscode.Uri.file(path.join(context.extensionPath, "dist")),
          ],
        }
      );

      const stylePath = path.join(
        context.extensionPath,
        "dist/assets/index-er7K2eTl.css"
      );
      const styleUri = panel.webview.asWebviewUri(vscode.Uri.file(stylePath));

      const bundlePath = path.join(context.extensionPath, "dist", "bundle.js");
      const bundleUri = panel.webview.asWebviewUri(vscode.Uri.file(bundlePath));

      panel.webview.html = `
        <!DOCTYPE html>
        <html lang="en">
        <head>
          <meta charset="UTF-8" />
          <meta name="viewport" content="width=device-width, initial-scale=1.0" />
          <title>React + Tailwind</title>
          <link href="${styleUri}" rel="stylesheet">
        </head>
        <body>
          <div id="root"></div>
          <script type="module" src="${bundleUri}"></script>
        </body>
        </html>
      `;
    })
  );
}
7. package.json Setup
This is where everything comes together. You need a command users can trigger and scripts to build both the backend and the webview.
Add the following sections to your package.json:
Command Registration
"contributes": {
  "commands": [
    {
      "command": "react-tailwind-extension.start",
      "title": "Start React + Tailwind Webview"
    }
  ]
},
Module Type
"type": "module",Scripts
"scripts": {
  "build-webview": "vite build",
  "dev-webview": "vite",
  "compile": "tsc -p ./",
  "watch": "tsc -w -p ./",
  "vscode:prepublish": "npm run compile && npm run build-webview"
}
How they fit together
npm run build-webviewbundles the React + Tailwind frontend intodist/.npm run compilegenerates the extension’s compiled backend inout/.npm run dev-webviewenables fast, HMR-powered development for the frontend (use this in one terminal during development).npm run watchkeeps the backend compiled (use this in a second terminal).vscode:prepublishensures both parts are built before you package your extension.
8. Build & Run Checklist
Before launching the extension, it helps to follow a short routine. Since VS Code webviews load assets strictly, missing a single path or hash usually leads to a blank panel.
- In your terminal, run the build scripts at least once:
npm run build-webview— creates thedist/assets/folder with the hashed React app.npm run compile— produces your compiled extension inout/.
- Press
F5in VS Code to launch the Extension Development Host. - Open the Command Palette (Cmd+Shift+P or Ctrl+Shift+P) → run
Start React + Tailwind Webview. - If nothing appears, open Developer Tools
Help > Toggle Developer Toolsand check the Console for CSP violations or 404 errors on asset paths.
If everything is wired correctly, your React + Tailwind interface will render inside VS Code, ready for user interaction!
9. Final Project Structure
Once the project is fully set up and built, it should look something like this. This layout keeps the extension logic, webview code, compiled output, and build tools neatly separated.
.
├── CHANGELOG.md
├── dist
│   ├── assets
│   │   └── index-er7K2eTl.css
│   └── bundle.js
├── eslint.config.mjs
├── out
│   ├── extension.js
│   ├── test
│   │   └── extension.test.js
│   └── webview
│       ├── App.js
│       └── index.js
├── package-lock.json
├── package.json
├── postcss.config.js
├── README.md
├── src
│   ├── extension.ts
│   ├── test
│   │   └── extension.test.ts
│   └── webview
│       ├── App.tsx
│       ├── index.css
│       └── index.tsx
├── tsconfig.json
├── vite.config.js
└── vsc-extension-quickstart.md
This structure makes it easy to maintain the project long-term: src/ is your development backend, webview/ is your development frontend, and dist/ and out/ hold the final compiled extension files.
Conclusion
With this setup, you now have a complete workflow for building a VS Code extension powered by a modern React + Tailwind webview. From scaffolding the extension to configuring Vite, wiring up the webview, and preparing production-ready builds, each step lays the foundation for more advanced panels, UI interactions, and backend features.
This structure isn’t just a starting point, it’s a flexible template you can reuse for future tools. Whether you’re planning data viewers, dashboards, interactive editors, or anything else that benefits from a richer interface, the same approach applies.
Explore further; implementing React Context for state management or reusing React components across different extensions. Do not be afraid to experiment and keep improving your extension with new features and polish.
Happy coding!