Miguel Aréjula Aísa
- 18/05/2025
Adding Google & GitHub Login to Your Astro Project
Want to let users sign in with their Google or GitHub account? This step-by-step guide shows you how to implement OAuth authentication in an Astro project using modern best practices.
In this tutorial, we will implement OAuth authentication in an Astro project using Google and GitHub as providers. We will use Auth.js, a powerful authentication library that simplifies the process of adding authentication to your web applications. By the end of this tutorial, you will have a fully functional authentication system that allows users to sign in with their Google or GitHub accounts.
Before we begin, make sure you have your Astro project set up. If you don’t know how to do this, check out my guide on Create your first Astro project. Once you have your project ready, you can add authentication to your application. Besides, its important that your project needs to have server-side rendering (SSR) enabled and an adapter configured. To set up this, you can follow the instructions in the Astro documentation.
Step 1: Install Dependencies
First, we need to install the necessary dependencies. Open your terminal and run the following command:
npx astro add auth-astroThis command will install the auth-astro package, which is a wrapper around Auth.js specifically designed for Astro projects. It will also install the required dependencies, including @auth/core, @auth/astro, and @auth/google and @auth/github for Google and GitHub authentication, respectively. You can manually install them, but I highly recommend using the astro add command, as it will automatically configure your project for you.
Step 2: Configure Auth.js
Next, we need to configure Auth.js in our Astro project. Create a new file called auth.config.mjs in the root of your project. This file will contain the configuration for Auth.js, including the authentication providers we want to use (Google and GitHub in this case).
import { defineAuth } from '@auth/astro';
import GoogleProvider from '@auth/google';
import GitHubProvider from '@auth/github';

export default defineConfig({
  providers: [
    GitHub({
      clientId: import.meta.env.GITHUB_CLIENT_ID,
      clientSecret: import.meta.env.GITHUB_CLIENT_SECRET,
    }),
    Google({
      clientId: import.meta.env.GOOGLE_CLIENT_ID,
      clientSecret: import.meta.env.GOOGLE_CLIENT_SECRET,
       authorization: {
        params: {
          prompt: 'select_account' // This will show the account selector screen even if the user already chose an account
        }
      }
    }),
  ]
});
In this configuration, we are defining two authentication providers: Google and GitHub. We are using environment variables to store the client ID and client secret for each provider. This is a good practice to keep sensitive information out of your codebase. In the example above, for the Google provider, we are also adding the prompt: ‘select_account’ parameter to the authorization request. This will show the account selector screen even if the user has already chosen an account. This is useful for testing purposes, as it allows you to switch accounts easily.
Step 3: Define the providers id and secrets
In order to use the authentication providers, we need to define the client ID and client secret for each provider. You can do this by creating a .env file in the root of your project. This file will contain the environment variables that we will use in our configuration. Also, you will need to add two more environment variables to the .env file. The first one is AUTH_SECRET, which is a random string used to sign the session cookie. The second one is AUTH_TRUST_HOST, which is a boolean value that indicates whether to trust the host header. This one is needed if you are using hosting providers like Cloudflare or Netlify. If you are using Vercel, you can skip this one.
GITHUB_CLIENT_ID=your_github_client_id
GITHUB_CLIENT_SECRET=your_github_client_secret
GOOGLE_CLIENT_ID=your_google_client_id
GOOGLE_CLIENT_SECRET=your_google_client_secret
AUTH_SECRET=your_auth_secret
AUTH_TRUST_HOST=true
To obtain the client ID and client secret for Google and GitHub, you need to create an OAuth application in their respective developer consoles. Follow these steps:
- Go to the Google Cloud Console. Select APIs and Services > Credentials.
- Create a new project or select an existing one.
- Navigate to the “Credentials” section.
- Click on “Create credentials” and select “OAuth client ID”.
- Configure the consent screen and select “Web application” as the application type.
- Add the authorized redirect URI: http://localhost:4321/api/auth/callback/google and http://localhost:4321 as the authorized JavaScript origin.
- Click “Create” and copy the client ID and client secret.
GitHub
- Go to the GitHub Developer Settings in your GitHub account settings.
- Click on “OAuth Apps” and then “New OAuth App”.
- Fill in the required fields:
- Application name: Your app’s name.
- Homepage URL: http://localhost:4321
- Authorization callback URL: http://localhost:4321/api/auth/callback/github
- Click “Register application”.
- Copy the client ID and client secret.
Step 4: Add the Login Button to your Application
Astro Auth provides a simple way to add login buttons to your application. It comes with two components: SignIn and SignOut. You can use these components to create login and logout buttons for your application. In this example, we will create a simple login page with buttons for Google and GitHub authentication. Create a new file called login.astro in the src/pages* directory of your project. This file will contain the login page for your application. In the following code, I am using Tailwind CSS to style the buttons, but you can use any CSS framework or custom styles you prefer.
---
import { SignIn } from 'auth-astro/components';
import Layout from "../layouts/Layout.astro";
---
<Layout>
<div class="flex justify-center mt-4 space-x-2">
<SignIn class="flex items-center px-4 py-2 border rounded-lg w-full justify-center hover:bg-gray-100 hover:cursor-pointer" provider="google">
<img src="https://www.svgrepo.com/show/355037/google.svg" class="w-5 h-5 mr-2" alt="Google" />
Google
</SignIn>
<SignIn class="flex items-center px-4 py-2 border rounded-lg w-full justify-center hover:bg-gray-100 hover:cursor-pointer" provider="github">
<img src="https://www.svgrepo.com/show/512317/github-142.svg" class="w-5 h-5 mr-2" alt="GitHub" />
GitHub
</SignIn>
</div>
</Layout>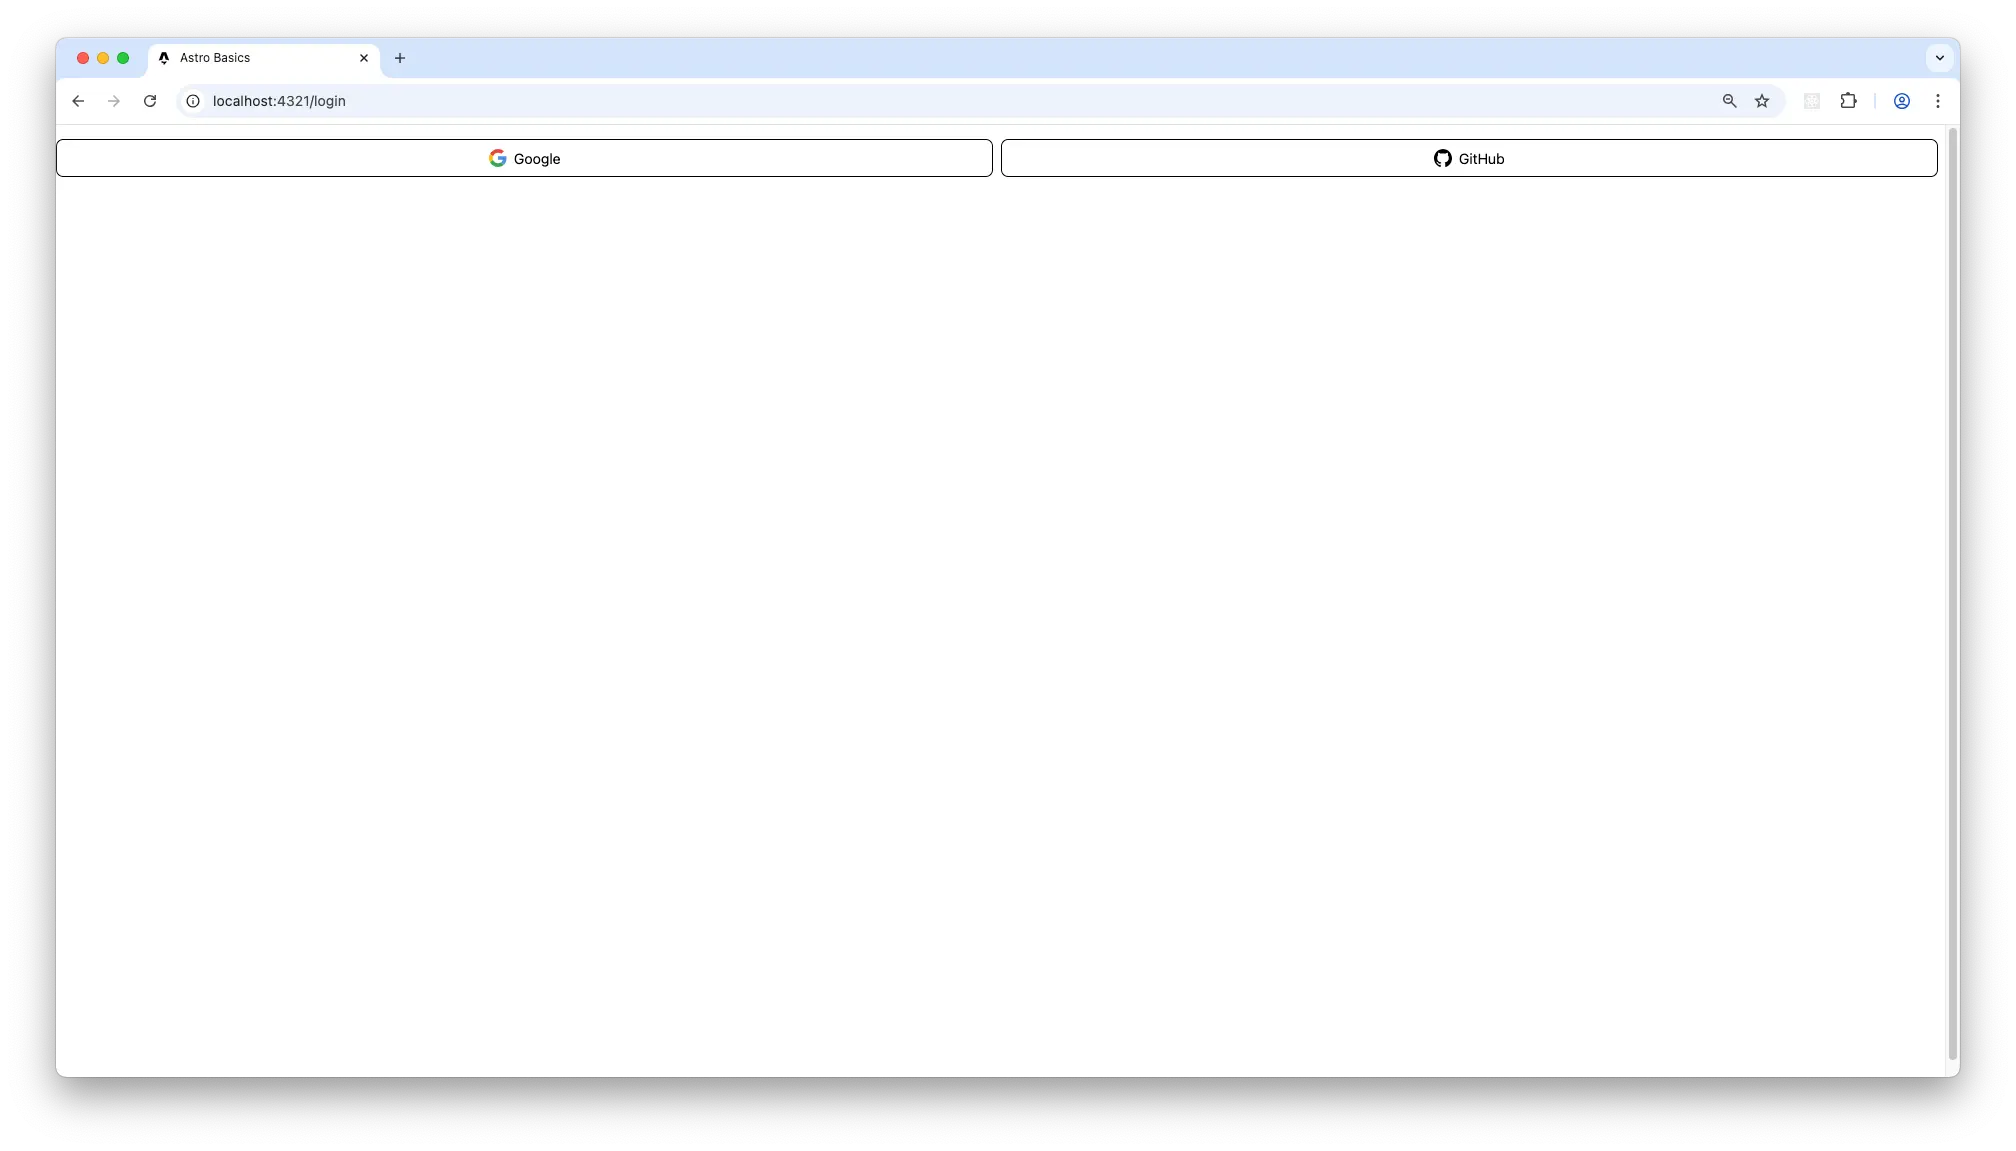 In this example, we are using the SignIn component to create login buttons for Google and GitHub. We are also using the LandingLayout component to wrap our login page. You can customize the styles and layout as needed. You will get a page like this:
Now, click on the buttons to sign in with your Google or GitHub account. You will be redirected to the respective provider’s login page, where you can enter your credentials. After successful authentication, you will be redirected back to your application.
Step 5: Get the User Session
After the user has logged in, you can access their session information using the getSession function provided by Auth.js. This function returns the session object, which contains information about the authenticated user, such as their name, email, and profile picture. You can use this information to display the user’s profile in your application.
---
import { getSession } from 'auth-astro/server';

const session = await getSession(Astro.request)
---
The session object will be similar to this:
{
  user: {
    name: Miguel Aréjula Aisa',
    email: 'arejula10@gmail.com',
    image: 'https://avatars.githubusercontent.com/u/92888725?v=4'
  },
  expires: '2025-06-17T20:28:57.710Z'
}
Something that I usually do is calling the getSession function in the login page to check if the user is already logged in. If the user is logged in, I redirect them to a page. You can do this by adding the following code to the top of your login.astro file:
---
import { getSession } from 'auth-astro/server';

const session = await getSession(Astro.request);
if (session) {
    return Astro.redirect('/profile');
}pr
---
This code checks if the user is already logged in by calling the getSession function. If the user is logged in, it redirects them to the user page using the Astro.redirect function. Where you can display the user information. To do this, create a new file called profile.astro in the src/pages directory of your project. This file will contain the user profile page for your application.
---
import Layout from "../layouts/Layout.astro";
import { SignOut } from 'auth-astro/components';
import { getSession } from 'auth-astro/server';
const session = await getSession(Astro.request);
if (!session ) {
return Astro.redirect('/login');
}
---
<Layout>
<section class="flex flex-col items-center justify-center min-h-screen bg-gray-50">
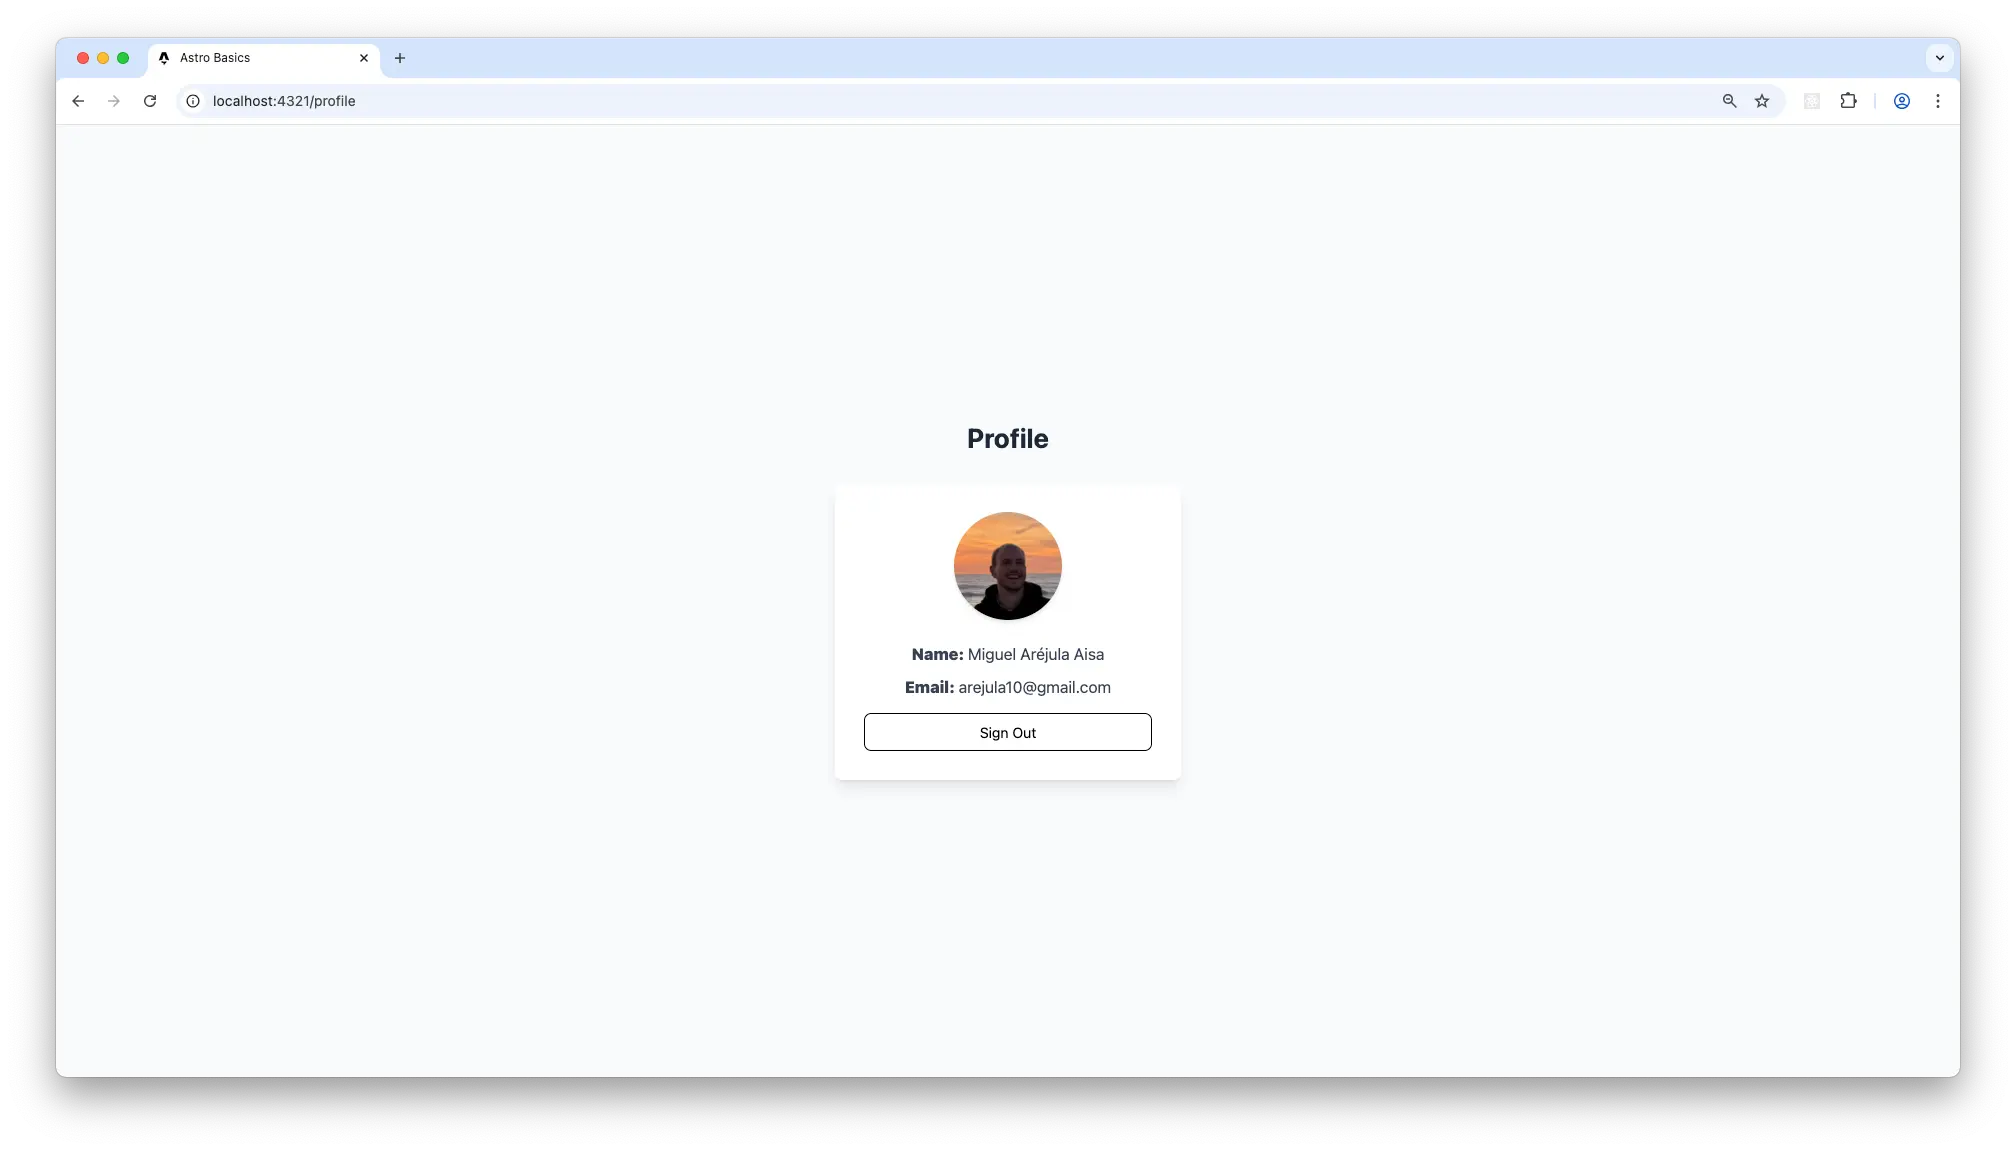
<h1 class="text-3xl font-bold mb-8 text-gray-800">Profile</h1>
<div class="bg-white shadow-lg rounded-lg p-8 flex flex-col items-center w-full max-w-sm">
<img src={session?.user?.image} alt="Profile Image" width="120" height="120" class="rounded-full mb-6 shadow-md" />
<p class="text-lg font-semibold text-gray-700 mb-2"><strong>Name:</strong> <span class="font-normal">{session?.user?.name}</span></p>
<p class="text-lg font-semibold text-gray-700"><strong>Email:</strong> <span class="font-normal">{session?.user?.email}</span></p>
</div>
</section>
</Layout> In this example, we are using the Layout component to wrap our profile page. We are also using the session object to display the user’s name, email, and profile picture. You can customize the styles and layout as needed.
Step 6: Logout
To log out the user, you can use the SignOut component provided by Auth.js. This component will handle the logout process for you. I usually add a logout button to the user profile page. You can do this by adding the following code to your profile.astro file:
---
import { SignOut } from 'auth-astro/components';
---
<SignOut class="mt-4 px-4 py-2 border rounded-lg w-full justify-center hover:bg-gray-100 hover:cursor-pointer">
    Sign Out
</SignOut>
So the final code of the profile.astro file will look like this:
---
import Layout from "../layouts/Layout.astro";
import { SignOut } from 'auth-astro/components';
import { getSession } from 'auth-astro/server';

const session = await getSession(Astro.request);
if (!session ) {
    return Astro.redirect('/login');
}
---
<Layout>
    <section class="flex flex-col items-center justify-center min-h-screen bg-gray-50">
        <h1 class="text-3xl font-bold mb-8 text-gray-800">Profile</h1>
        <div class="bg-white shadow-lg rounded-lg p-8 flex flex-col items-center w-full max-w-sm">
            <img src={session?.user?.image} alt="Profile Image" width="120" height="120" class="rounded-full mb-6 shadow-md" />
            <p class="text-lg font-semibold text-gray-700 mb-2"><strong>Name:</strong> <span class="font-normal">{session?.user?.name}</span></p>
            <p class="text-lg font-semibold text-gray-700"><strong>Email:</strong> <span class="font-normal">{session?.user?.email}</span></p>
            <SignOut class="mt-4 px-4 py-2 border rounded-lg w-full justify-center hover:bg-gray-100 hover:cursor-pointer">
                Sign Out
            </SignOut>
        </div>
    </section>
</Layout>
Simply click on the “Sign Out” button to log out the user. The SignOut component will handle the logout process for you and redirect the user back to the login page.
Conclusion
In this guide, we implemented OAuth authentication in an Astro project using Google and GitHub as identity providers. This approach offers a secure and user-friendly way to handle authentication without the need to manage passwords yourself.
Adding more providers is straightforward, just register a new OAuth application in the provider’s developer console and update your auth.config.mjs file accordingly.
This guide focused on the client-side setup. In future posts, we’ll dive deeper into how to handle authentication on the server side. As a sneak peek: you’ll typically use the getSession function to retrieve the session on the client and send it to your server, where you’ll validate it with the provider. The server can then issue a secure session token and return the authenticated user’s details—storing the token in a cookie or local storage for subsequent requests. Happy coding!