Miguel Aréjula Aísa
- 30/03/2025
Mastering API Documentation: Why It Matters and How to Use Swagger with Express
API documentation is the backbone of seamless software integration and developer collaboration. In this guide, wou will explore why API documentation is crucial and how Swagger can simplify and standardize the process in Express applications.
Why API Documentation Matters
API documentation is not just a technical requirement; it’s a vital part of the software development lifecycle. Here are some key reasons why it matters:
-
Clarity and Understanding: Well-documented APIs provide clear instructions on how to use them, reducing confusion and errors.
-
Collaboration: In a team environment, API documentation serves as a reference point for developers, ensuring everyone is on the same page.
-
Integration: For third-party developers, comprehensive API documentation is essential for integrating with your service.
-
Maintenance: As APIs evolve, documentation helps keep track of changes, making it easier to maintain and update the API.
-
Testing: Good documentation can also serve as a basis for automated testing, ensuring that the API behaves as expected.
-
Onboarding: New developers can quickly get up to speed with well-structured API documentation, reducing the learning curve.
-
User Experience: For public APIs, clear documentation enhances the user experience, making it easier for developers to adopt and use your API.
What is Swagger?
Swagger is a powerful toolset for API documentation and design. It provides a standardized way to describe RESTful APIs using the OpenAPI Specification (OAS). Swagger offers a range of features that make it an excellent choice for documenting APIs:
- Interactive Documentation: Swagger UI allows developers to interact with the API directly from the documentation, making it easier to understand how the API works.
- Code Generation: Swagger can generate client libraries, server stubs, and API documentation in various formats, saving time and effort.
- Standardization: By adhering to the OpenAPI Specification, Swagger ensures that your API documentation is consistent and easy to understand.
- Versioning: Swagger supports versioning, allowing you to maintain multiple versions of your API documentation.
- Ecosystem: Swagger has a rich ecosystem of tools and libraries that can be integrated into your development workflow.
- Community Support: Swagger has a large and active community, providing a wealth of resources, tutorials, and plugins.
- Integration with Testing Tools: Swagger can be easily integrated with testing tools like Postman, making it easier to test and validate your API.
- Security: Swagger supports security definitions, allowing you to document authentication and authorization mechanisms for your API.
- Open Source: Swagger is open-source, allowing developers to contribute and customize the tool according to their needs.
Setting Up Swagger with Express
To get started with Swagger in an Express application, follow these steps:
Step 1: Install Dependencies
First, you need to install the necessary dependencies. You can do this using npm or yarn. Open your terminal and run the following command:
npm install swagger-ui-express swagger-jsdocStep 2: Create Swagger Configuration
Create a new file named swagger.js in your project directory. This file will contain the Swagger configuration. Here’s a basic example:
// swagger.js
const swaggerJsDoc = require('swagger-jsdoc');
const swaggerUi = require('swagger-ui-express');
const swaggerOptions = {
  swaggerDefinition: {
    openapi: '3.0.0',
    info: {
      title: 'My API',
      version: '1.0.0',
      description: 'API documentation for my Express application',
    },
    servers: [
      {
        url: 'http://localhost:3000',
      },
    ],
  },
    apis: ['./app/routes/*.js'], // Path to the API docs
};
const swaggerDocs = swaggerJsDoc(swaggerOptions);
module.exports = {
  swaggerUi,
  swaggerDocs,
};
Step 3: Integrate Swagger with Express
In your main Express application file (app.js), import the Swagger configuration and set up the Swagger UI route:
// app.js
const express = require('express');
const { swaggerUi, swaggerDocs } = require('./swagger');
const app = express();
const PORT = process.env.PORT || 3000;
app.use('/api-docs', swaggerUi.serve, swaggerUi.setup(swaggerDocs));
app.listen(PORT, () => {
  console.log(`Server is running on http://localhost:${PORT}`);
});
Step 4: Document Your API Endpoints
Now, you can start documenting your API endpoints using JSDoc comments. For example, in your route files (e.g., routes/user.js), you can add comments like this:
// routes/user.js
var express = require('express');
var router = express.Router();

/**
 * @swagger
 * /users:
 *   get:
 *     summary: Get all users
 *     description: Retrieve a list of all users.
 *     responses:
 *       200:
 *         description: A list of users.
 */
router.get('/users', (req, res) => {
  // Your code to get users
  res.json([{ id: 1, name: 'John Doe' }]);
});

/**
 * @swagger
 * /users/{id}:
 *   get:
 *     summary: Get a user by ID
 *     description: Retrieve a user by their unique ID.
 *     parameters:
 *       - name: id
 *         in: path
 *         required: true
 *         description: The ID of the user to retrieve.
 *         schema:
 *           type: integer
 *     responses:
 *       200:
 *         description: A user object.
 */
router.get('/users/:id', (req, res) => {
  const userId = req.params.id;
  // Your code to get a user by ID
  res.json({ id: userId, name: 'John Doe' });
});
/**
 * @swagger
 * /users:
 *   post:
 *     summary: Create a new user
 *     description: Create a new user with the provided data.
 *     requestBody:
 *       required: true
 *       content:
 *         application/json:
 *           schema:
 *             type: object
 *             properties:
 *               name:
 *                 type: string
 *               email:
 *                 type: string
 *     responses:
 *       201:
 *         description: User created successfully.
 */
router.post('/users', (req, res) => {
  const newUser = req.body;
  // Your code to create a new user
  res.status(201).json(newUser);
});

/**
 * @swagger
 * /users/{id}:
 *   put:
 *     summary: Update a user by ID
 *     description: Update a user's information by their unique ID.
 *     parameters:
 *       - name: id
 *         in: path
 *         required: true
 *         description: The ID of the user to update.
 *         schema:
 *           type: integer
 *     requestBody:
 *       required: true
 *       content:
 *         application/json:
 *           schema:
 *             type: object
 *             properties:
 *               name:
 *                 type: string
 *               email:
 *                 type: string
 *     responses:
 *      200:
 *        description: User updated successfully.
 */
router.put('/users/:id', (req, res) => {
  const userId = req.params.id;
  const updatedUser = req.body;
  // Your code to update a user by ID
  res.json({ id: userId, ...updatedUser });
});

module.exports = router;
Step 5: Run Your Application
Now, you can run your Express application and access the Swagger UI at http://localhost:3000/api-docs. You should see the interactive documentation for your API endpoints.
npm start app.jsStep 6: Explore Swagger UI
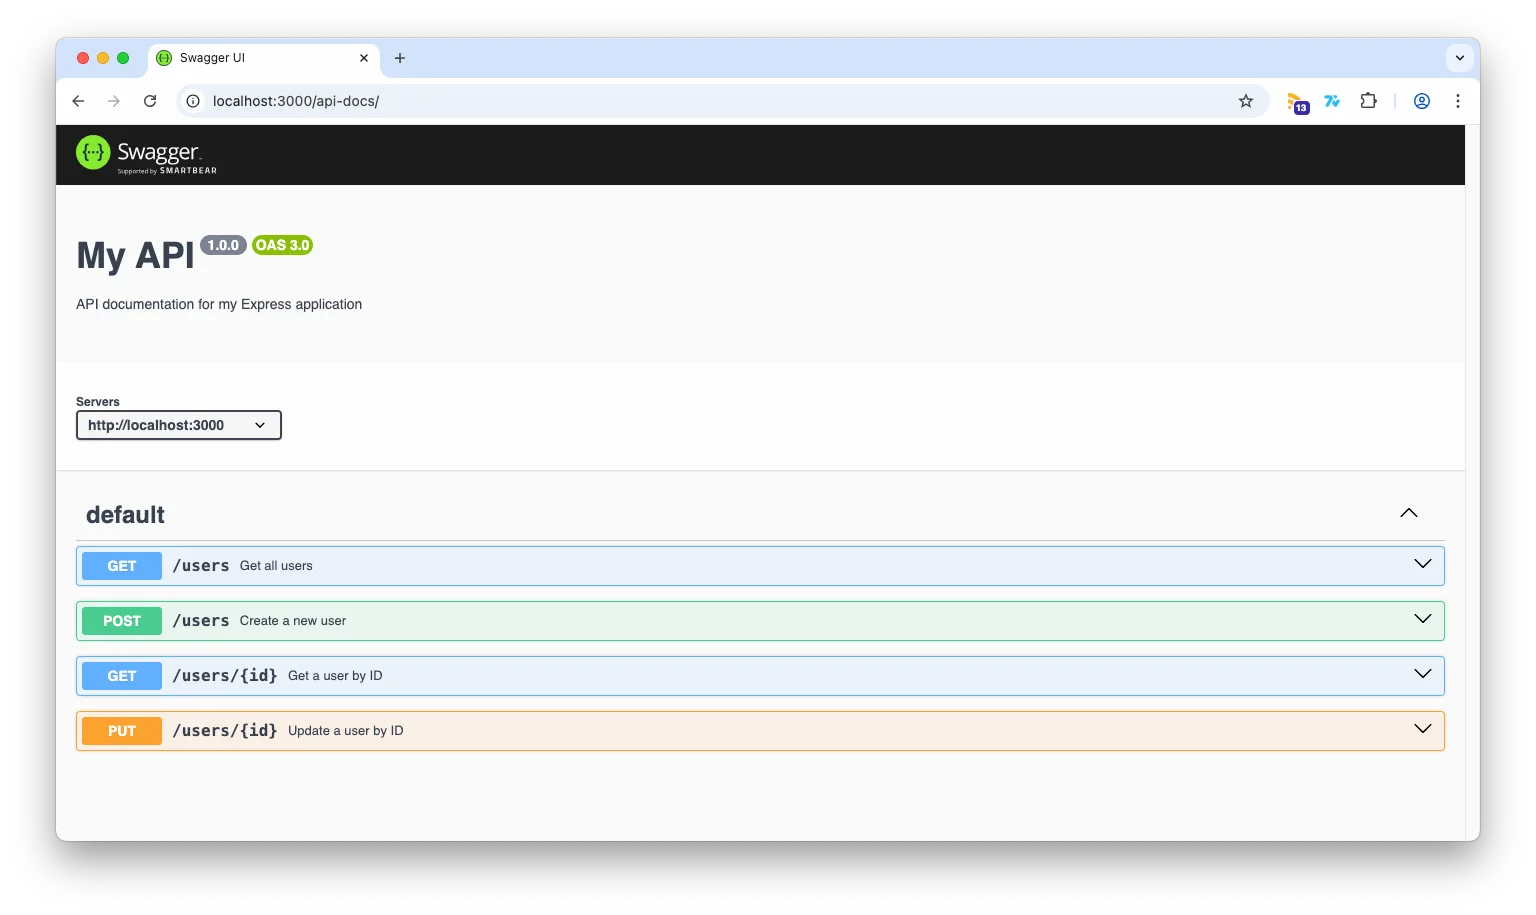
Open your web browser and navigate to http://localhost:3000/api-docs. You should see the Swagger UI with your documented API endpoints. You can interact with the API directly from the documentation, making it easy to test and understand how your API works.
You will see the endpoints you documented, along with their descriptions, parameters, and response formats. You can also try out the endpoints directly from the Swagger UI.
Conclusion
In this guide, we explored the importance of API documentation and how Swagger can simplify the process in Express applications. By following the steps outlined above, you can create comprehensive and interactive API documentation that enhances collaboration, integration, and user experience. Embrace the power of Swagger and elevate your API documentation to the next level!